Friday, 24 December 2010

Holly Jolly Cupcake Christmas

Hey there everybody, are we all excited about Santa's imminent visit? I've been cuddled up on the sofa all day watching Christmas films which has been great, and last night I had a few friends and family round for mulled wine savory snacks and cupcakes and secret Santa gifts and I even got a few early Christmas presents!

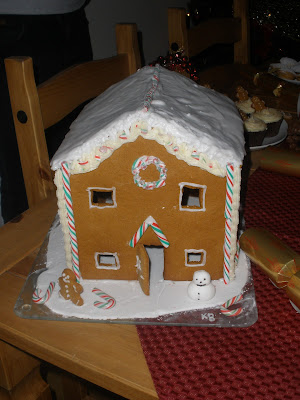
I even made a gingerbread house for the occasion! I didn't have a decent template for one and as usual I wasn't very organised so I didn't even have any paper or a ruler so I made my own template using the back of some wrapping paper and the edge of a book. then once assembled I iced the roof and decorated with icing and candy canes! Here's the house:

 And here's my dining table filled with the cakes:
We had cakes that I've previously featured on my blog, there was Gingerbread spice cupcakes and Mint chocolate candy cane cupcakes:

There were Gingerbread men, trees and Christmas stockings, decorated with icing, peppermint icing and crushed candy canes:

There were also mince pies:

So as I've featured all the gingerbread and cakes no recipe today but I just wanted to write this blog to wish you all a very happy Christmas and I hope you all have lots of tasty food and get some lovely presents! Speaking of lovely presents as I said earlier I got some early Christmas of one of my friends and they were great! And as my friends know me so well they were of course cupcake related. I got some extremely cute cupcake PJ's, here I am modeling them (I cut my head off as I looked pretty ropey hahaha)


Please ignore my rather large thighs, but how cute is the cupcake on the PJ's, It even has a super cute spotty waistband that you can't see here. I also got some cupcake shorts to match as well as some cupcake bath bombs:


and some cupcake lip gloss in adorable little holders:


So, so far it's been a very Cupcake Christmas. Merry Christmas everybody I'm sure your all on Santa's nice list. finally here's my doggy in his new (and slightly silly) Christmas bandanna:


Bye for now

Cupcake Kris xx

Wednesday, 15 December 2010

Christmas Spice Cupcakes with Mini Gingerbread men

Ooooh only 10 days to go, I'm very excited, I've almost bought and wrapped every present I've nearly finished making the berry wreath I'm working on and I've just made the cutest little cupcakes. Why are they so cute? Well because on top of them they have mini gingerbread men smiling back at you!

I found some mini cookie cutters and I just couldn't help my self so on Wednesday I made some Gingerbread I made mini cookies to top my cakes with as well as larger gingerbread men and gingerbread Christmas trees. Here's One of the bigger cookies:


 He's waving! And he's all like "Oh Haaaii" hehehe

And since I used mini gingerbread men to top the cakes, first of all here's how the ginger bread is made:

This recipe makes quite allot of dough so half if needed.

500g Plain Flour
Pinch of Salt
2 Tsps Ground Ginger
1 Tsp Mixed Spice
2 Tsp Bicarbonate of Soda
125g Butter
60g Soft Dark Brown Sugar
60g Caster Sugar
5 Tbsps Golden Syrup
1 Egg Beaten

Preheat oven to 180deg C. Sift flour, salt, ginger, mixed spice and bicarbonate into a bowl, mix and make a well in the centre. Put the Butter, Sugars and syrup into a pan and lightly heat while stirring until melted. Pour into flour mixture, add egg and mix to form a dough. Adding a bit more flour if necessary.
Flour surface and knead the dough. Roll out and cut into shapes, re roll out trimmings until all is used. If adding raisins to cookies (for buttons etc) , add before baking. Place on a greased baking sheet, with room between each cookie for spreading, and bake for 10-15 mins until lightly browned. If you have allot of cookies you may need to bake in batches.Leave to cool and then ice.

And here are the cakes with their little Gingerbread men:


I just couldn't help smiling when I saw them all lined up smiling back at me. Here's how the cakes were made:

Makes 12
120g Plain Flour
70g Caster Sugar
70g Dark Brown Soft Sugar
1 1/2 Tsp Baking powder
40g Butter
120ml Milk
1 Egg
1/2 Tsp Vanilla extract
1 Tsp Ground Ginger
1 Tsp Mixed Spice

For the frosting 
250g Icing Sugar
80g Unsalted Butter
2ml Milk
Few drops of Vanilla extract
Grating of fresh Nutmeg

Pre heat oven to 170deg C. Put the flour, sugars, baking powder and butter into a bowl and rub together (or mix with an electric whisk until you have a sandy consistency. Gradually pour in half the milk and mix until just incorporated. Whisk the egg, vanilla and remaining milk together and then add to the mix. Add the Ginger and Mixed spice and mix until well combined. Spoon the mixture into paper cases and bake for about 20 minutes. A skewer inserted into the middle should come out clean. Leave to cool before icing.  
For the icing, blend the sugar, butter, milk and vanilla together, Pipe over cakes and grate a little nutmeg over the top. Top with a little Gingerbread man. And that's it!


Bye for now, and happy Christmas baking

Cupcake Kris xx

Sunday, 12 December 2010

Christmas baking: Mint Chocolate Candy Cane Cupcakes.

Hey, so Christmas is getting even closer with only a couple of weeks to go and I still haven't baked any where near the amount of Christmassy treats I planned to bake in preparation. Although it seems that when I do bake something anyway it doesn't last very long before it's eaten so I might as well give in on trying to be prepared.

This week though I baked some Christmassy candy cane cupcakes as I found the cutest little mini candy canes that I knew would look adorable on top of a cup cake.

And here they are: 


To make them you just need to follow the basic chocolate cupcake recipe (featured earlier on this blog) Then when you have the batter mix in 100g plain chocolate chopped into chunks and 2 tsps of Peppermint flavoring. Then pour batter into cake cases and bake at 170 deg C for about 20 mins.

For the butter cream use 250g Icing Sugar, 85g Butter and blend together with 1 1/2 tsp of peppermint flavouring and milk, adding a few drops at a time until you have the right consistency. Pipe over the cooled cakes. Then for the messy bit take a few mint candy canes and place in a small bag or under some greaseproof paper and bash with a rolling pin till crushed into tiny pieces, then sprinkle over the cakes and top with a mini candy cane if you have one or if not a piece of broken regular size candy cane will work.

And that's it! Now I'm off to bake tiny gingerbread cookies with these really cute cookie cutters I found and to make boyfriend draw me some templates for a gingerbread house.

I'm also going looking for more presents. Is it just me or does anyone else absolutely adore wrapping presents? I actually feel sad when I've finished with wrapping them all as I want to wrap more! I've found these adorable gift bags this year too with 50's pin up girls in Christmas suits which look great. I can't wait to give all my presents out (and of course receive some!) so what are you all wishing for this Christmas?


Bye for now and get baking for Christmas


Cupcake Kris xxx

Tuesday, 7 December 2010

No cakes but dried fruit Christmas decorations.

I've been so busy this week that it has totally passed me by that I haven't made any cakes! I'd usually be itching to get into the kitchen but this week I haven't even had the time to think about it. I've been busy Decorating the house for Christmas, Shopping for presents, advising new friends about cupcake baking, looking for outfits for work Christmas nights out and going to cheer on my friend and her little girl complete the Liverpool 5k Santa dash and little 4 year old Alicia walked the whole way! So extra congratulations to her.

This week I have baked something though  - although it wasn't edible. I decided after seeing some at the continental market that I was going to make my own dried fruit Christmas decorations. They're pretty, natural, cheap and they smell nice. And most importantly they're really easy to make. And here is my first attempt.


And here's how it's made:
You will need
Small oranges / satsumas
Apples
Lemons
Cinnamon sticks
Cloves

Its best to pick Fruit with vibrant colours as this will look better and all you need to do to dry fruit out is slice some oranges/ Apples and Lemons horizontally or take an orange and make slices vertically all around the orange (you can also insert cloves all around the sliced orange if desired) and bake these in the oven on the lowest temperature for about 2 -3 hours turning half way until the skin is slightly hardened and you have a thick leathery texture, as the fruit cools it will harden more! Ok so 2-3 hours is a long time right? well you can also dry the fruit out much quicker in the microwave.

Simply put slices in the microwave for 2-4 minutes turning half way and wiping away any excess liquid on the plate (Whole satsumas will take about 5-6 minutes) WARNING: if drying the fruit in the microwave you need to pretty much watch it constantly as it will suddenly burn. At the point the fruit is just slightly burnt i think i like it best as you get nice browns to as well as a spicy fruity burnt smell.

Take the fruit out to cool before threading onto some thick picture wire along with Cinnamon sticks (This but can need patience and strength to push the wire through)

Make a loop at each end and twist the wire to secure, then thread some Christmassy ribbon through the wire to enable you to hang it up.

And that's it! I've also been making jewelery for friend's Christmas presents and for my sister this week so that's another thing that's halted my baking endeavors. Here's a ring a made for my sister.


So sorry no cakes yet this week but hopefully in the next few day's there will be something Christmassy.

Till next time

Cupcake Kris xx

Monday, 29 November 2010

The first of many Mince pies.

This week I started on what will undoubtedly be the first of many mince pies to be made over Christmas. My idea was that I'd be very organised, get a head start, make loads of mince pies and then freeze some so at any opportune moment over the holiday I could get some out the freezer and they would be ready! Well that was the plan any way, but like most of my plans to be organised it went straight out the window just a day after the Mince pies were baked.
This is because there's now just 2 left out of about 30 pies. I made the mistake of putting them near the boyfriend and taking some to work, so now I have to stock up on more ingredients and start again on my Christmas batches.

Any way here they are:
 Now one thing I've always believed is that you don't need allot of fancy equipment to bake, I mean they did without it years ago right? And for someone who loves to bake I have very little equipment. I didn't have a cookie cutter to cut the discs for these pies which wasn't an issue as I simply used the rim of an appropriately sized glass instead.

Now to make these mince pies I just used store bought mince meat as I believe that you can get some really tasty and good value mincemeat in the supermarkets that it really isn't worth the money effort making my own, Maybe I need to taste some homemade mincemeat to be convinced otherwise but until then I'll buy mine.

I simply made up a basic pastry recipe, cut out 24 discs then greased a shallow cupcake dish and placed 12 of the discs in. I then filled each with a teaspoon full of mincemeat and brushed around the edge with beaten egg before placing another disc on top. Then I crimped the edges of the pie together with a fork and brush the top with beaten egg and sprinkled a bit of granulated sugar on top. I baked these in the oven for about 20 mins at 180 deg C or until the pastry was golden brown. Then once cool I dusted the pies with icing sugar.

For my pastry I used

260g Plain flour
110g Butter

Rub these together until you have a sandy consistency then add a table spoon of water and then blend together. Repeat this until you have a smooth dough being careful not to add to much water. Wrap the dough in clingfilm and leave to rest for an hour before rolling on a floured surface.

And that's it!

Just a simple one for today but they're something that I end up making like a factory production line this time of the year as they go so fast. So fast in fact that boyfriend could wait a couple of minutes when the first batch came out the oven and ended up with a burnt chin from molten hot mincemeat. So remember they are tempting but leave them to cool! hehe!

Bye for now

Cupcake kris. xx

Sunday, 28 November 2010

Lemon Drizzle Loaf

It seems to me I have been making a lot of citrus flavoured treats of late, well a lot for me any way. I have surprised myself as I've always really been an avid devotee towards chocolate. But again this week I found myself zesting a juicing lemons like it was second nature.

The main reason I went for Lemon Drizzle this week is because there was yet another Charity bake sale at work, this time for Children in need. I'd usually make a carrot cake or something similar, but with it being just a week before pay day I needed a cake that the ingredients for would be pretty cheap. So of to tesco I went and came back with the ingredients for a Lemon drizzle cake. (Oh and 24 Peanut butter cookies which I also made for the sale - Recipe for these featured in an earlier blog.)

And here's the Lemon Drizzle Loaf:


 You can see the little bits of crystallized lemon zest over the top.

And here's how it's made:
(Recipe slightly adapted from the Hummingbird bakery recipe)

320g Caster Sugar
3 eggs
Zest of 2 lemons
350g Plain Flour
1 1/2 Tsp Baking Powder
Pinch of Salt
250ml Milk
1/2 Tsp vanilla extract
200g Unsalted Butter, Melted
Juice of half Lemon

For the Lemon Syrup

Juice of 1 1/2 Lemons
Zest of 1 Lemon
75g Caster Sugar
100ml Water

You will need: 23x 13 (or approx 2lb) loaf tin

Preheat oven to 170 deg C. Put the sugar eggs and lemon zest in a bowl and beat until well mixed. In a separate bowl mix the flour, salt and baking powder and mix together. In a jug mix together the milk and vanilla extract. Add one third of the flour mixture to the sugar mixture and beat well, then beat in one third of the milk mix. Repeat this twice until all ingredients are combined. Add the lemon juice and beat all the ingredients together (on a high speed if using an electric mixer) until light and fluffy.
Pour in the melted butter and beat until well combined. 
Pour the mixture into a loaf tin and bake for about 1 hour 15 until golden brown and the sponges springs back when touched.

While the cake is baking, put the lemon juice, zest, sugar and water in a saucepan and bring to the boil over a low heat. Raise the heat and boil until it has reduced by half or until you have a thin syrupy consistency.
When the hot cake comes out of the oven leave to cool slightly in the pan and then turn onto a wire rack, Place this in or over the sink. (this is to catch any drips from the syrup)  Prick the cake all over to make small holes for some syrup to soak into, and I found a great tip from watching Nigella Lawson that the perfect thing to do this with is a piece of uncooked spaghetti. Then pour the syrup all over the top and the excess syrup will run down over the edges into the sink. And that's it. It's a great afternoon tea cake.


See all the syrupy lines down the side of the cake.

That's it

Have fun baking

Cupcake Kris
xx

Monday, 22 November 2010

Pink lemonade cupcakes

Hi folks, hope you all had a good weekend! I'm so glad that my blog is getting more and more views as it goes on and I've passed way over 500 views so far in the short time I've been writing it, but before today's recipe I have a favour, please suggest my blog to people, because who doesn't like cakes!

Any way this weekend I had to bake some cupcakes (as usual!) I originally was going to bake vanilla and chocolate cupcakes with pink icing however I really wanted to do something different and a bit more fun so I decided to make the cakes themselves pink and go for a pink lemonade flavour cupcake with a lemonade butter cream.

There were loads of recipes online for Pink Lemonade cakes that all used a frozen pink lemonade concentrate that doesn't seem to be on sale in the UK so I sort of made this one up as I went along and they worked out really well considering. They also went well with the Chocolate cupcakes I made with them as the Lemonade ones were really refreshing. I got the pale pink colour with some red food colouring but you could just leave them plain.

Here they are:

And inside:


And here's how I made them:

120g Plain Flour
140g Caster Sugar
1 1/2 Tsp Baking Powder
40g Unsalted Butter
50ml Milk
60ml Lemonade (Use pink lemonade if you can get it but normal will do fine)
1 Egg
1/4 tsp Vanilla extract
Zest of 1 small lemon
Juice of 1 small lemon
Red food colouring.

Preheat the oven to 170 deg C
Mix together in a bowl the Flour, Caster sugar and Baking Powder, then rub in the butter or mix with an electric hand whisk until you have a sandy consistency.
Then mix in the lemon zest. In a jug whisk together the milk, vanilla and egg and add to the mix and stir until combined.
Then add the lemon juice and lemonade then beat the mix until smooth then add the food colouring a couple of drops at a time whilst stirring until you get the pink colour you want, I went for a very pale pink so I didn't over do it with food colour.
spoon the mix into paper cases 2/3 full and bake in the oven for 20 - 25 Minutes or until when a skewer inserted into a cake comes out clean. Be careful not to over bake these as you will loose the pink colour on top if the cake browns.

For the Icing 
250g Icing Sugar
80g Unsalted Butter
Zest of 1 small lemon
25ml Lemonade

Beat all the ingredients together until smooth and firm, do not over mix. Pipe over cupcakes.

And that's it! Here they are along with the Chocolate cupcakes I made which were pretty much the same as last weeks.


Ok that's it for today

Keep baking

Cupcake Kris

xx


Cupcake on FoodistaCupcake

Friday, 19 November 2010

Chocolate and Ammaretto cupcakes and Christmassy beginings!

I'm feeling in a very Christmassy mood today! I left work early and had a little wander around the town centre and saw so many decorations and good ideas for presents which put me in such a good mood as I love Christmas! (Is it too early to put up my tree?)

And being in a Christmassy mood its got me thinking of all the things I want to bake over the next couple of months and no doubt they will involve allot of Christmassy ingredients so I best stock up on Ginger, Nutmeg, Cinnamon and dried fruit etc. I'm already licking my lips at the thought of all the mince pies, gingerbread men and fruit cake I will no doubt make to many off. I'm also thinking about snow men cake pops and about making a gingerbread house as I made a huge one a few years back (complete with boiled sweet stained glass windows) It was a big project but looked great finished. It almost makes me feel the season should be longer to allow for more baking! The food is definitely my favourite part of Christmas.
Let me know what your favourite Christmas treat is, give me some ideas. 

Any way so enough of me getting carried away with Christmas cheer, this week I've been baking more cupcakes. Chocolate and Amaretto cupcakes to be exact. I've been meaning to use Amaretto in a cupcake for a while but I have to admit, these ones came about by accident. Boyfriend sudenly decided late one night that he needed cake and I was in the mood to bake (as usual) so before checking all my ingredients I hurriedly threw together all the dry ingredients before realising I was out of milk, at which point I improvised! And here they are!
I apologise for the really bad pic! I know it just looks like a Chocolate cupcake and this is why we really need smellovision so you can smell the Amaretto hehe!

If I would have planned this cake more ahead I definitely would have made the butter cream better and probably topped it with crushed Amaretti biscuits!

Here's how they're made:

Makes 12.
120g Plain flour
25g Cocoa Powder
150g Caster Sugar
1 Tsp Baking Powder
50g Unsalted Butter
2 Eggs
big glug of Amaretto (About 100ml or until you have a nice consistency)
Few drops of Vanilla extract
Few drops of Almond extract


Preheat the oven to 170 deg . Mix all the dry ingredients together and rub in the butter until you have a sandy consistency.
Whisk the Eggs, Vanilla and almond together in a jug and pour about into the dry mix and beat to combine.Then add the Amaretto gradually until the mixture is smooth, free of lumps and off a good consistency.
Spoon the mixture into paper cases two thirds full and bake in the oven for 20-25 minutes until the cake springs back when lightly pressed.

For the Amaretto butter cream.
250g Icing Sugar
80g Unsalted Butter
2-3 Tbs Milk
3-4 Tbs Amaretto

Blitz all ingredients together until you get the right consistency  - add more Icing sugar, and Amaretto as needed.

And that's it!
I have to make a few cupcakes for a Christening this weekend too so I've also been practicing getting the right colour pink butter cream. It looks more peach on the pic but it was more of a bubblegum pink, in fact it looked like I'd piped bubblegum right onto the cake.


That's it for now any way! Have a fun weekend and let me know if you bake any thing yummy!

Bye for now
Cupcake Kris 

Tuesday, 9 November 2010

Banana French toast cupcakes.

It's been a busy week for me and I've been meaning to blog for a few days now but I've been away to the countryside, Where I was super excited to find a cupcake cafe on my travels (I just had to go in) It was Boyfriends birthday, I made Rocky road with my friend and her daughter then yesterday I made Banana French toast cupcakes.

I was browsing through a few of my favourite baking blogs the other day looking for inspiration when I came across a recipe for Banana french toast cupcakes with Maple butter cream on bake and destroys website, and I just had to make them. I love french toast, I love banana and I love maple syrup so I thought what's not to like. Plus they reminded me of another of my favourite deserts which is French donut toast with maple syrup.

The recipe on the site was a vegan recipe (which I un-veganed by using cows milk) so I was a little weary at first as I've never made a cupcake like that before but they worked out perfect, really airy and still moist. The butter cream however is definitely not vegan.

Anyway here they are: 

And here's how their made:
Recipe via Bake and Destroy

As the recipe was American the measurements are in cups, I had never measured like this before so just figured I use a normal cup and fill however much they say, and it worked fine.

1/2 cup mashed over ripe banana
1 & 1/4 cups plain flour
1/4 tsp baking soda
1 tsp baking powder
1 tsp cinnamon
pinch of salt
3/4 cup caster sugar
1/3 cup of canola oil (They don't really sell this over here so I used sunflower oil)
2/3 cup of milk (soy or rice if making vegan)
1 tsp vanilla extract
1/2 tsp almond extract
(Their recipe also called for 1/2 cup of chopped toasted walnuts but I left these out as I'm not a fan of walnuts)

Preheat the oven to 180 deg C, and line a cupcake pan with liners. Sift the flour, baking powder, baking soda, cinnamon, salt and sugar into a bowl and mix well.
In another bowl whisk together the oil, milk, vanilla almond and banana, then stir this mix into the dry ingredients until all the ingredients are combined. (If adding walnuts fold these in now)
Fill liners 2/3 full and bake for 20- 22 mins or until the tops spring back when lightly touched. Cool in the pan for ten minutes then remove to a wire rack to cool completely.

And that's it for the cakes now onto the maple butter cream:

2 cups of icing sugar 
3/4 Cup of unsalted butter
2 1/2 tbsp of Maple syrup
few drops of milk (added a drop at a time until I got the right consistency)

Whip everything together then pipe generously on the cakes. I then sprinkled my cakes with crushed ginger biscuit.

And that's it, Nom nom nom!

I mentioned before about making Rocky road with my friend and her little girl well here that is too:

 I think Rocky road is the perfect thing to make with little kids as it requires no baking so you don't have to worry about hot ovens. So while I melted 400g of milk chocolate in a bowl over a pan of water my friend Nickie helped Alicia throw a big handful of mini marsh mellows into a bowl, followed by a big handful of raisins, some crushed up digestive biscuit a chopped up mars bar, some rice crispies and some chopped glace cherries. Then we poured in the melted chocolate, gave it all a big stir and poured it into a brownie tray lined with greaseproof paper, Alicia then decorated it with pretty sprinkles and we left it to set in the fridge. Then we gobbled it all hehehe!

So that's all for this week, but just before I go look at the super cute hair clip that Boyfriend bought me!

It's a cupcake! super cute huh!

Bye for now!

Cupcake Kris
xx
Monday, 1 November 2010

Spiced raisin bunt cake.

Hi! I spent all of this Saturday morning baking ice cream cone cakes and cake pops for another party so after all that, practicing with biscuit icings, baking bread and making a roast dinner I really didn't plan to bake anything else this weekend but on Sunday night and with few ingredients I found I couldn't help myself.
So I raided the cupboards and found some leftover raisins a quarter a pack of muscovado sugar, got together some spices and threw it all in with some basic ingredients. And it turned out really nice, Boyfriend certainly enjoyed eating about half the cake hehehe. The spices and raisins made it warming and perfect for this time of year, I ate my piece warm and think it would be really nice with custard too.
It's a really easy one so I'd definitely recommend giving this a go. 
Here it is:

And here's how it's made: (note I'm making an educated guess as to how much spices i used as I didn't measure but just kept tasting the batter and adding more depending on my taste, I suggest you do the same)

200g Self raising flour
200g Butter, softened
100g Caster Sugar
100g Dark Muscovado Sugar
1 tsp Baking Powder
4 eggs
2 handfuls of raisins (ok I know this isn't a precise measure however you can add as little or as many as you like)
1 tbsp Cinnamon 
1 tbsp Mixed spice
1/2 tbsp Ginger

Pre heat the oven to 180 degrees C 
Put the butter, flour and baking powder into a bowl and rub together with your fingertips until you get a sandy consistency then add the sugars and eggs and beat with an electric whisk until you have a smooth batter.
Add the raisins  and spices and stir until evenly distributed within the batter (At this point I then tasted the batter and added a bit more spice depending on taste)
Grease a bunt cake tin (or just an ordinary cake or loaf tin if you prefer) and pour in the batter.
Bake in the oven for about 30 minutes or until a skewer inserted into the middle comes out clean. Remove from the oven and turn onto a wire rack to cool.

And there you go! really easy and just a few ingredients. As I said I think it's best warm and would be really yummy served with custard. I also think If you have more ingredients you could be really creative with this, throwing in all sorts of dried fruit, orange zest, liqueurs etc but I like it just how it is, simple and tasty.

Before I go I'll show you my attempts at biscuit icing I mentioned. I've been practicing with flooding icing and once I've gotten better I'll make sure I make a batch and blog about it but for now here's my first attempt.
  Yes that is my fingerprint at the bottom having squished the icing before it set!

Also here's the party cakes I mentioned I make this weekend. There were cake pops

As well as ice cream cone cakes and as it was Halloween I made some with orange icing and topped each one with a spider, bat or pumpkin shaped jelly sweet.

So that was my weekend, It's boyfriends birthday this week too so I 'll have to me making something for that too or he'll feel left out hehehe.

So bye for now, get baking and let me know what you make.
Cupcake Kris

Wednesday, 27 October 2010

Cupcakes, Conecakes and the attack of the giant gummy bear!

So I haven't made anything new this week because at the weekend I had my first order for party cupcakes. I was asked to make 12 cupcakes and 20 Ice cream cone cakes for a joint birthday of two of my sisters friends children.
So come Sunday morning my kitchen was enveloped in a cloud of icing sugar! I went for Vanilla cupcakes with a blue vanilla butter icing and chocolate conecakes with a vanilla icing and chocolate wafers. Then as my sister turned up earlier than expected I let her do the sprinkles (allot of which she ate hehehe)
Here they are:  - Not the best photos as they were all packed up and ready to go
 I love the little star sprinkles so cute! And the two cakes with sugar paste C's on them were for the Birthday boys, Callum and Connor.

Being in cones, these are a nightmare to transport without them wobbling about hence the tissue paper packing them in.

So that's what I did this weekend (as well as baking a ton of bread too). As well as that I've been trying to find a cake decorating evening class for me to sign up for and I'm still on the lookout for a good one.

Finally look at this!
 It's a giant monster gummi bear! It was a gift for my birthday and isn't it just awesome! That's my little cousin who was given the great honour of taking the first bite! (That's also my crazy dog in the background eyeing it up) It's super tasty too.

Any ways that's it for today, sorry there's no recipe but hopefully in the next few days as there so much tasty stuff I want to make  - I'm just having trouble deciding what to make next.

So I'm off to the kitchen to brainstorm and scour the cookbooks
Bye for now
Cupcake Kris

Sunday, 17 October 2010

Lemon meringue cupcakes.

I've been wanting to try this recipe for Lemon meringue cupcakes for a while now but I've been a little busy recently. I've actually bought the lemon required for this recipe 3 times now before finally getting round to making them. The first lemon was sacrificed to the god of gin, the second was left in the fruit bowl to long as I didn't have time to bake and the third, lucky lemon got to fulfil it's destiny to be part of this recipe.

And here they are:


I love the colour of toasted meringue
 And here's how they're made!  - Recipe ala the BBC website.

Makes 8

100g Butter
100g Caster Sugar 
Few drops of vanilla extract
2 large eggs
100g Self raising flour
1 Lemon  - Zest only
75g ready made lemon curd

For the meringue topping:
2 egg whites
100g caster sugar

Preheat oven to 180 deg C. Cream the butter, sugar and vanilla together in a bowl until pale and fluffy.
Crack and beat the eggs in one at a time until combined.
Fold in the flour and lemon zest.
Place cupcake cases into a tray and spoon in mixture. Add a teaspoon of lemon curd to the top each cake.
Bake for 15 - 20 minutes until a pale golden colour on top. The lemon curd will sink to make a yummy gooey centre.

For the meringue topping: whisk the egg whites with an electric whisk until soft peaks are formed. Gradually add the sugar whisking continuously until stiff peaks form and the mixture is thick and glossy. (If your brave you can even try the test of holding the bowl upside down briefly to make sure the mixture doesn't budge)
Spoon the mixture on top of the cupcakes and make peaks in the topping with your spoon. Put the cakes under the grill for 2-3 minutes each until the topping is golden brown.

And there you go Lemon meringue cupcakes with a really gooey lemony centre. 

This was my first one and could have done with a bit less topping and a few more minutes under the grill (But i didn't take any other cut in half pics of the others)

So that's it! They're really easy to make and so tasty and as a person that usually always goes for chocolate its nice to have a change and with lemon being a fruit i can even try to convince myself that its kind of healthy, hehehe.

Before I go for today, just look at my new charm I got. I saw it and just couldn't help it as I'm obsessed with anything cupcake. 

Cute huh?

Anyway bye for now, have fun and keep baking.

Cupcake Kris

Friday, 8 October 2010

Cake Poppin!

So one of my favourite all time baking blogs and one that was a big inspiration to me to start my own blog is www.bakerella.com. And for a while now I've wanted to try Bakerella's most famous invention: Cake Pops!

They're basically little cake's that look like lollipops and they're so cute! Bakerella decorates hers in so many different and creative ways but I thought for my first attempt I'd just go plain until I get used to the dipping and getting the right shape.

So here they are! I had to use some polystyrene to stand them in

And how it's done!

You need:
Cake
Frosting
Candy melts or chocolate
Lollipop sticks
Something to stand them in - Box with punched holes/ polystyrene etc


First you need some pre baked cakes, I used Chocolate - The chocolate cupcake recipe from earlier in the blog!


2 of these made about 6 pops! the rest I just filled with toffee sauce and iced so I had 2 desserts in one cake tin!

Once the cakes are cooled you need to break them up and mix together in a bowl with some frosting  - I used Vanilla (The vanilla frosting used in the chocolate cupcake recipe) as I didn't want chocolate overload. You need to use about a table spoon of frosting for each cake. Then blend the two together until really well combined.
 Frosting and cake ready to be smooshed together!

After  Smooshing together you need to roll your cake balls

Then put these in the freezer to chill for a few minutes. While they are chilling take your candy melts - I used Vanilla (Or you could use chocolate - however candy melts are best) and melt them in a bowl over a pan of water.

Dip the top of each lolly stick  into the melted candy melts then insert into the middle of each cake ball and put these back in the freezer for a couple more minutes. This helps the lolly stick hold itself on the cake ball easier.  After a minute or two its then time to dip!

Dip and swirl each cake pop in the candy melts, then tap off any excess and stand each one up using something like a box with holes or polystyrene.


At this point you can sprinkle with hundreds and thousands if you want. Then place in the pops in the fridge to set. Then it's time to bite into them.


And there you go, my first attempt at cake pops. 


Once they're set they can be decorated with edible pens, fondant etc which I think I will try next!
And again I have to mention my good friend Russ to say thank you for sending me the candy melts. I love them, I even frosted a cupcake in the left over melted candy to make a hard topped, "cracking cupcake" (sorry about the cheesy name, I can't help it hehe)

Any ways that's it for now I have 10 cupcakes to ice!

Keep baking!

Cupcake Kris