And now on to a more serious note, I know it doesn't exactly fit in with the theme of my blog but I want to urge you all to take a look at one of my friends blogs. Jen is a lovely girl of just 24 with a great family and two beautiful children. However she has recently found out she has Hodgkin's Lymphoma. She is one of the bravest people I know and she is documenting her journey here.
dont worry about jen
It's a wonderful blog that not only raises awareness of the subject but also helps herself and others who are going through the same thing. She is doing a wonderful thing in writing it and through it she is documenting her ups, downs, feelings and all the little worries that she thinks about, as well as the bigger picture. It is an emotional read but Jen's positive attitude shines though in her writing and you can truly get a picture of the loving wonderful person she is, through writing this I think she is not only going to have an outlet for everything that's in her head but she is going to help so many other people whether they be people going through the same thing or friends and family of people that are. She writes with honesty and detail which will put other sufferers at ease knowing that they are not alone which is just like Jen as she is very selfless and always thinking of others.
I hope you all follow her story and progress and wish her well as I'm very proud of what she is doing here, despite all that is happening to her. She is as I said a very brave person with strong determination so I know she is going to come through this on top. Please send out your love to my friend and like her help raise awareness because as she says "I’m a very open person but maybe they aren’t and it’s very comforting to know when somebody has gone through something similar to you and your not alone."
Thursday, 15 March 2012


A Very Princess Birthday
Phew, I think March is definitely my busiest Month for cakes as well as having a couple of cupcake orders last week I have 66 cupcakes to make this week alone for birthdays, bake sales, St Patrick's day and Mothers day. I love it though and I'm hopefully also going to have time to try a few new flavours out too and prepare for making batches of hot cross buns for Easter.
However my most important baking adventure last week was definitely a surprise birthday cake for one of my best friends Alex, or as I call her, Princess! We were going for a meal for Alex's birthday and I'd decided I definitely wanted to drop a cake off at the restaurant for them to bring out, knowing full well she would relish in the fuss over her! haha. Any way all I had to do was decide on the design of the cake. I went with a plain Vanilla sponge with buttercream as Alex and a few other friends have given up chocolate for lent (Madness) and for the design there was really only one option, over the top bling! Alex loves anything sparkly and over the top, so I knew straight away a girly over the top cake was were I was headed. I decided on pink icing with princess Alex written in white, I then had to find something for the middle! And then I found the giant pink feathers and sparkly stars! So they blocked the word princess from view at the front but it really didn't matter as they were so very Alex. Any way here's the cake:

And the back:

Any way the cake was very well received and her face when they brought it out in the restaurant was priceless and well worth the effort of making it! Here's a little closer picture of the bling!

And that's the princess cake.
I've linked up to sweets for saturday
However my most important baking adventure last week was definitely a surprise birthday cake for one of my best friends Alex, or as I call her, Princess! We were going for a meal for Alex's birthday and I'd decided I definitely wanted to drop a cake off at the restaurant for them to bring out, knowing full well she would relish in the fuss over her! haha. Any way all I had to do was decide on the design of the cake. I went with a plain Vanilla sponge with buttercream as Alex and a few other friends have given up chocolate for lent (Madness) and for the design there was really only one option, over the top bling! Alex loves anything sparkly and over the top, so I knew straight away a girly over the top cake was were I was headed. I decided on pink icing with princess Alex written in white, I then had to find something for the middle! And then I found the giant pink feathers and sparkly stars! So they blocked the word princess from view at the front but it really didn't matter as they were so very Alex. Any way here's the cake:

And the back:

Any way the cake was very well received and her face when they brought it out in the restaurant was priceless and well worth the effort of making it! Here's a little closer picture of the bling!

And that's the princess cake.
I've linked up to sweets for saturday
Wednesday, 7 March 2012
Mmmmmm warm and tasty Cherry Pie
Cherry pie is one of the boyfriends favourite desserts (he has a lot of favourites) and it's something I've been meaning to bake for a while.
I actually made this a week or so ago but I've been quite busy and have just come back from a lovely weekend away in the lakes that involved lots of walking, hiking, relaxing and a lot of good food including some amazing homemade cakes.
Any way back to the cherry pie, it's such a simple but tasty desert and is one of those desserts I see as homely proper baking perfect for curling up on the couch with on a cold night. I'm not a massive fan of pies but the pastry was lovely and soft with a crisp top and not to dry and the filling was super tasty, the almond extract and added brandy (optional) give it a lovely taste. Here it is:

Ok so boyfriend couldn't wait till I'd taken a picture to have a warm slice so it's a rushed very bad picture of most of the pie, the filling also was more than it looks on this picture.

Next time I will try to be more uniform and neat with my lattice top but I wasn't very patient this time.
Any way here's how it's made:
Cherry lattice pie: (via the big book of baking)
For the pastry:
140g Plain flour, plus extra for dusting
1/4 tsp Baking powder
1/2 tsp Mixed spice
pinch Salt
50g Caster sugar
55g Unsalted butter, diced, plus extra for greasing
1 egg Beaten plus extra for glazing.
For the filling:
900g Stoned fresh cherries or canned cherries, drained (and stoned if not already)
150g Caster sugar
1/2 tsp Almond extract
2 tsp Cherry brandy (optional) - regular brandy can also be used.
1/4 tsp Mixed spice
2 tbsp Cornflour
2tbsp Water
25g Butter
To make the pastry, sift the flour and baking powder into a large bowl. Stir in the mixed spice salt and sugar then rub in the butter until the mixture has a breadcrumb like consistency. Add the beaten egg and mix into a firm dough, adding a few drops of water if needed. roll into a ball and wrap in clingfilm, Chill in the fridge for 30 minutes.
Preheat the oven to 220degC and grease a 9 inch round tart tin. Cut the pastry in half and roll out into two rounds, using one to line the tin.
To make the filling, put half the cherries with the sugar into a pan and bring to a simmer over a low heat, stirring until the sugar has melted. stir in the almond extract, brandy and mixed spice. In a separate bowl mix together the cornflour and water. Remove the pan from the heat and stir in the cornflour paste, then return to the heat and stir until the mixture boils and thickens. Leave to cool a little before stirring in the remaining cherries. Pour this into the pastry case and dot with butter.
Cut the remaining pastry round into strips and lay some across the pie and then the remainder running the other way, folding under every other strip to form a lattice, I found that you need to lift the strips right up to do this without getting covered in filling so make sure you don't stick any ends down until your done. Trim off the edges and seal with water. Crimp around the rim with your fingers or a fork the brush the top with beaten egg.
Cover with foil then bake in the oven for 30 mins then remove the foil and bake for a further 15 minutes or until golden.
And that's all. I have loads of cupcake orders for March, it's a busy month for birthday's and holidays so I'm off to get planning the next batch.
Cupcake Kris
xxx
I actually made this a week or so ago but I've been quite busy and have just come back from a lovely weekend away in the lakes that involved lots of walking, hiking, relaxing and a lot of good food including some amazing homemade cakes.
Any way back to the cherry pie, it's such a simple but tasty desert and is one of those desserts I see as homely proper baking perfect for curling up on the couch with on a cold night. I'm not a massive fan of pies but the pastry was lovely and soft with a crisp top and not to dry and the filling was super tasty, the almond extract and added brandy (optional) give it a lovely taste. Here it is:

Ok so boyfriend couldn't wait till I'd taken a picture to have a warm slice so it's a rushed very bad picture of most of the pie, the filling also was more than it looks on this picture.

Next time I will try to be more uniform and neat with my lattice top but I wasn't very patient this time.
Any way here's how it's made:
Cherry lattice pie: (via the big book of baking)
For the pastry:
140g Plain flour, plus extra for dusting
1/4 tsp Baking powder
1/2 tsp Mixed spice
pinch Salt
50g Caster sugar
55g Unsalted butter, diced, plus extra for greasing
1 egg Beaten plus extra for glazing.
For the filling:
900g Stoned fresh cherries or canned cherries, drained (and stoned if not already)
150g Caster sugar
1/2 tsp Almond extract
2 tsp Cherry brandy (optional) - regular brandy can also be used.
1/4 tsp Mixed spice
2 tbsp Cornflour
2tbsp Water
25g Butter
To make the pastry, sift the flour and baking powder into a large bowl. Stir in the mixed spice salt and sugar then rub in the butter until the mixture has a breadcrumb like consistency. Add the beaten egg and mix into a firm dough, adding a few drops of water if needed. roll into a ball and wrap in clingfilm, Chill in the fridge for 30 minutes.
Preheat the oven to 220degC and grease a 9 inch round tart tin. Cut the pastry in half and roll out into two rounds, using one to line the tin.
To make the filling, put half the cherries with the sugar into a pan and bring to a simmer over a low heat, stirring until the sugar has melted. stir in the almond extract, brandy and mixed spice. In a separate bowl mix together the cornflour and water. Remove the pan from the heat and stir in the cornflour paste, then return to the heat and stir until the mixture boils and thickens. Leave to cool a little before stirring in the remaining cherries. Pour this into the pastry case and dot with butter.
Cut the remaining pastry round into strips and lay some across the pie and then the remainder running the other way, folding under every other strip to form a lattice, I found that you need to lift the strips right up to do this without getting covered in filling so make sure you don't stick any ends down until your done. Trim off the edges and seal with water. Crimp around the rim with your fingers or a fork the brush the top with beaten egg.
Cover with foil then bake in the oven for 30 mins then remove the foil and bake for a further 15 minutes or until golden.
And that's all. I have loads of cupcake orders for March, it's a busy month for birthday's and holidays so I'm off to get planning the next batch.
Cupcake Kris
xxx
Monday, 20 February 2012
Chocolate Eclairs and Valentine Cupcakes
I have had a long weekend this week with an extra day off from work, although I have been very busy dealing with buttercream of another nature. I decided to paint my dining room and part of my living room and the colour I chose was called buttercream, proving that definitely almost every part of my thinking is ruled by baking.
but today after all that painting I have been making chocolate eclairs, I first made these a few days ago and they tasted fine however were a little smaller than I wanted and I didn't wait for the chocolate icing to set a little before topping (well I was hungry) so they didn't look as neat as todays lot, they also didn't last long enough for me to take a picture (oops) so today I used that as a good excuse to make some more, of course it just wasn't that I wanted to eat more it was definitely all the name of getting a picture (hehe).
Any way, they are really yummy and the pastry cream is very moorish, i usually always bake cake rather than pastry but i will definitely be making these more for friends and family (or maybe just me!) here they are:


And filled with yummy pastry cream,

and here's how they are made:
Chocolate Eclairs
For the choux pastry:
150ml Water
70g Butter, diced
100g Plain Flour, sifted
2 eggs
For the pastry cream:
2 Eggs
4tbsp Caster Sugar
2tbsp Cornflour
300ml Milk
1/4 tsp Vanilla Extract
For the icing:
2tbsp Butter
1tbsp Milk
1tbsp Cocoa
55g Icing Sugar
Pre heat oven to 200degC and lightly grease a couple of baking trays.
Place the water in a saucepan with the butter and heat gently until the butter melts, bring to a rolling boil. remove the saucepan from the heat and add the flour all at once beating well until the mixture leave the sides of the saucepan and forms a ball. Leave to cool slightly, then gradually beat in the eggs until you have a smooth, glossy mixture. Spoon into a piping bag fitted with a large round nozzle, I found a disposable piping bag with the end cut off worked fine.
Sprinkle the baking trays with a little water and pipe the eclairs well spaced apart with room to rise. Bake in the oven for around 30 minutes or until crisp and golden in colour. Make a small slit in the side of each eclair then cool on a wire rack.
For the pastry cream. Whisk the eggs and caster sugar until thick and creamy then whisk in the cornflour. Heat the milk until almost boiling and pour onto the egg mixture whilst beating. Transfer these to a saucepan and cook over a low heat stirring until thick. (This part is really important as the first time i stopped stirring and turned my back for a second and the mixture had thickened, so for a smooth mixture, stick with stirring) Remove from the heat and stir in the vanilla. Leave to cool.
To make the icing, melt the butter with the milk, remove from the heat and then stir in the sugar and cocoa. Leave to chill and set slightly.
Split the eclairs lengthways and pipe in the cooled cream. Spread the icing over the top of the eclairs. This time I made the icing in advance and waited until it had almost set and piped on top in ribbons.
The eclairs can then be decorated with a mix of icing sugar and water piped on (as I have here) or some melted white chocolate drizzled over.
and that's it!
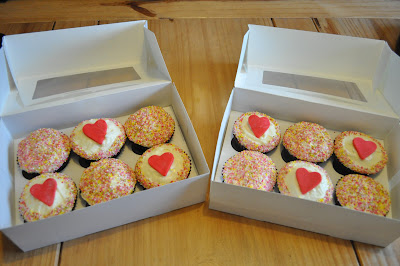
Also as last week was valentines I also had some orders for valentines cupcakes, some were decorated with rolos (last rolos) and sprayed with edible silver and the others with cream cheese frosting and sugar hearts, and they were very well received. here they are:

but today after all that painting I have been making chocolate eclairs, I first made these a few days ago and they tasted fine however were a little smaller than I wanted and I didn't wait for the chocolate icing to set a little before topping (well I was hungry) so they didn't look as neat as todays lot, they also didn't last long enough for me to take a picture (oops) so today I used that as a good excuse to make some more, of course it just wasn't that I wanted to eat more it was definitely all the name of getting a picture (hehe).
Any way, they are really yummy and the pastry cream is very moorish, i usually always bake cake rather than pastry but i will definitely be making these more for friends and family (or maybe just me!) here they are:


And filled with yummy pastry cream,

and here's how they are made:
Chocolate Eclairs
For the choux pastry:
150ml Water
70g Butter, diced
100g Plain Flour, sifted
2 eggs
For the pastry cream:
2 Eggs
4tbsp Caster Sugar
2tbsp Cornflour
300ml Milk
1/4 tsp Vanilla Extract
For the icing:
2tbsp Butter
1tbsp Milk
1tbsp Cocoa
55g Icing Sugar
Pre heat oven to 200degC and lightly grease a couple of baking trays.
Place the water in a saucepan with the butter and heat gently until the butter melts, bring to a rolling boil. remove the saucepan from the heat and add the flour all at once beating well until the mixture leave the sides of the saucepan and forms a ball. Leave to cool slightly, then gradually beat in the eggs until you have a smooth, glossy mixture. Spoon into a piping bag fitted with a large round nozzle, I found a disposable piping bag with the end cut off worked fine.
Sprinkle the baking trays with a little water and pipe the eclairs well spaced apart with room to rise. Bake in the oven for around 30 minutes or until crisp and golden in colour. Make a small slit in the side of each eclair then cool on a wire rack.
For the pastry cream. Whisk the eggs and caster sugar until thick and creamy then whisk in the cornflour. Heat the milk until almost boiling and pour onto the egg mixture whilst beating. Transfer these to a saucepan and cook over a low heat stirring until thick. (This part is really important as the first time i stopped stirring and turned my back for a second and the mixture had thickened, so for a smooth mixture, stick with stirring) Remove from the heat and stir in the vanilla. Leave to cool.
To make the icing, melt the butter with the milk, remove from the heat and then stir in the sugar and cocoa. Leave to chill and set slightly.
Split the eclairs lengthways and pipe in the cooled cream. Spread the icing over the top of the eclairs. This time I made the icing in advance and waited until it had almost set and piped on top in ribbons.
The eclairs can then be decorated with a mix of icing sugar and water piped on (as I have here) or some melted white chocolate drizzled over.
and that's it!
Also as last week was valentines I also had some orders for valentines cupcakes, some were decorated with rolos (last rolos) and sprayed with edible silver and the others with cream cheese frosting and sugar hearts, and they were very well received. here they are:


Well that's all for today, now to plan what to bake next... after I eat this last eclair.
xxx
Thursday, 9 February 2012
Light and Fluffy Chocolate Mocha Cake and After Eight Cupcakes
One of my best friends is on what she calls the wedding dress diet so when me and a few others were visiting her house last week and bringing all sorts of treats to eat round I couldn't leave her out but wanted to give her a lower fat option so she didn't feel to guilty when having a treat.
Of course I couldn't possibly bring myself to only make and eat low fat cake so I also made some sinful cupcakes too to make up for all that light airy but not so guilty baking.
For the lower fat cake I used my trusty good food cakes app on my Ipod touch as I knew they had a specific section for low fat cakes. I'd already decided (as I had most of the ingredients) that it was going to involve chocolate in some way so I decided on the Light and Fluffy Chocolate Mocha Cake. It's only 180kcal a slice with only 3g of saturated fat per slice, mainly due to the lack of butter and oil. and here it is:

My cake is a little thinner as I didn't have the right size tin and I have to admit the cake in their picture looked far darker in colour, I have a sneaky suspicion they cheated and added more cocoa (or maybe it's just their photography)I was also meant to take a picture of the cake once cut but I forgot as I often to when there's cake to be eaten.
The base of the cake itself is made in a way I have never tried before (you need a table top mixer or an electric hand whisk) and it does indeed make the cake very airy and light, It's not intensely chocolaty and the filling and topping is made using fat free Greek yogurt, I'd say it's not a very indulgent cake but hey, what do you want for low fat, and considering the amount of calories per slice it's definitely worth a go if you want a treat but are trying to be good.
Any way, here's how it's made:
Light and Fluffy Chocolate Mocha Cake, via Good food cake app.
For the cake
3 Large Eggs
85g Caster Sugar
70g Plain Flour
1tbsp Cornflour
2tbsp Cocoa
1/2 tsp baking powder
For the Icing / Filling
25g Dark Chocolate chopped (Don't use 75% or the icing will be to bitter)
1tbsp Strong Black Coffee
100g Light Soft Cheese
100g 0% Greek Yogurt
2tbsp Icing Sugar
To decorate
15g Dark Chocolate chopped
Pre heat the oven to 180dgC. Lightly butter 2 x18cm Sandwich tins and then line the bases with baking paper.
Whisk the eggs and sugar until light and fluffy, about 5 mins in a tabletop mixer of 10 mins with an electric hand whisk. The mix will have increased greatly in volume and be thick enough to leave a trail and the surface when the blades are lifted.
Sift the flour, cornflour, cocoa and baking powder over the surface of the egg mix and fold in gently using a large metal spoon. Divide between the tins, gentry spreading to the edges, then bake for 15-20 mins until the cakes are well risen, have begun to shrink away from the sides of the tins and spring back when gently pressed. Leave to cool in the tins for 5 mins then turn out onto a wire rack to cool.
To decorate, microwave the chocolate and coffee together for about 20-30 seconds until the chocolate has melted. Gently stir until smooth, then cool slightly. Beat the soft cheese with the yogurt and and icing sugar until smooth, spoon half this mixture into a bowl stir in the melted chocolate and set aside.
Place one cake on a serving plate and spread with the yogurt mixture, cover with the other cake, then spread the chocolate yogurt mixture on top.
To finish, melt the 15g of chocolate, stir until smooth, cool slightly then drizzle over the cake.
And that's it!
As I said before I also made some full fat chocolate cakes too, I made a batch of After eight cupcakes. A chocolate peppermint cupcake topped with mint frosting and a mint chocolate. Here they are:


The recipe is the same as my Mint chocolate candy cane recipe except using a bit of Green food colour in the icing and topping with a mint chocolate instead of crushed candy cane. I preferred these far more than the low fat cake, but they do come with an extra serving of guilt. Oh well if I have both that evens it out right?
Any way that's all for today, I'm off to eat a failed batch of macaroons all in one go and pretend they never existed.
Bye for now
Cupcake Kris
Of course I couldn't possibly bring myself to only make and eat low fat cake so I also made some sinful cupcakes too to make up for all that light airy but not so guilty baking.
For the lower fat cake I used my trusty good food cakes app on my Ipod touch as I knew they had a specific section for low fat cakes. I'd already decided (as I had most of the ingredients) that it was going to involve chocolate in some way so I decided on the Light and Fluffy Chocolate Mocha Cake. It's only 180kcal a slice with only 3g of saturated fat per slice, mainly due to the lack of butter and oil. and here it is:

My cake is a little thinner as I didn't have the right size tin and I have to admit the cake in their picture looked far darker in colour, I have a sneaky suspicion they cheated and added more cocoa (or maybe it's just their photography)I was also meant to take a picture of the cake once cut but I forgot as I often to when there's cake to be eaten.
The base of the cake itself is made in a way I have never tried before (you need a table top mixer or an electric hand whisk) and it does indeed make the cake very airy and light, It's not intensely chocolaty and the filling and topping is made using fat free Greek yogurt, I'd say it's not a very indulgent cake but hey, what do you want for low fat, and considering the amount of calories per slice it's definitely worth a go if you want a treat but are trying to be good.
Any way, here's how it's made:
Light and Fluffy Chocolate Mocha Cake, via Good food cake app.
For the cake
3 Large Eggs
85g Caster Sugar
70g Plain Flour
1tbsp Cornflour
2tbsp Cocoa
1/2 tsp baking powder
For the Icing / Filling
25g Dark Chocolate chopped (Don't use 75% or the icing will be to bitter)
1tbsp Strong Black Coffee
100g Light Soft Cheese
100g 0% Greek Yogurt
2tbsp Icing Sugar
To decorate
15g Dark Chocolate chopped
Pre heat the oven to 180dgC. Lightly butter 2 x18cm Sandwich tins and then line the bases with baking paper.
Whisk the eggs and sugar until light and fluffy, about 5 mins in a tabletop mixer of 10 mins with an electric hand whisk. The mix will have increased greatly in volume and be thick enough to leave a trail and the surface when the blades are lifted.
Sift the flour, cornflour, cocoa and baking powder over the surface of the egg mix and fold in gently using a large metal spoon. Divide between the tins, gentry spreading to the edges, then bake for 15-20 mins until the cakes are well risen, have begun to shrink away from the sides of the tins and spring back when gently pressed. Leave to cool in the tins for 5 mins then turn out onto a wire rack to cool.
To decorate, microwave the chocolate and coffee together for about 20-30 seconds until the chocolate has melted. Gently stir until smooth, then cool slightly. Beat the soft cheese with the yogurt and and icing sugar until smooth, spoon half this mixture into a bowl stir in the melted chocolate and set aside.
Place one cake on a serving plate and spread with the yogurt mixture, cover with the other cake, then spread the chocolate yogurt mixture on top.
To finish, melt the 15g of chocolate, stir until smooth, cool slightly then drizzle over the cake.
And that's it!
As I said before I also made some full fat chocolate cakes too, I made a batch of After eight cupcakes. A chocolate peppermint cupcake topped with mint frosting and a mint chocolate. Here they are:


The recipe is the same as my Mint chocolate candy cane recipe except using a bit of Green food colour in the icing and topping with a mint chocolate instead of crushed candy cane. I preferred these far more than the low fat cake, but they do come with an extra serving of guilt. Oh well if I have both that evens it out right?
Any way that's all for today, I'm off to eat a failed batch of macaroons all in one go and pretend they never existed.
Bye for now
Cupcake Kris
Monday, 23 January 2012
Cinnamon Rolls
Hello, yet again I feel I have abandoned my blog of late and I haven't updated in a while. I've still been keeping up with all the wonderful blogs I follow and copying lots and lots of recipes down for baking in the future. I haven't had much chance to bake myself though which has made me very sad. But I have been happily busy with lots of exciting things!
One of my best friends is getting married next January and I was delighted that she has asked me to be a bridesmaid! she has also asked me to bake all the cupcakes for the wedding so there has been a lot of planning and looking at pictures of cupcakes and cases that she would like. I have also been a dutiful bridesmaid and we all went along to a wedding fair to look at all the pretty things and organise some of the most important aspects of the wedding (Chocolate fountain!)
I've also had an important cocktail meeting with friends, went to the cinema to see The Artist (Brilliant and I'm just in love with Uggie the little dog) and then this weekend I've been enjoying the Chinese new year festivities watching the dragon dance and then out to dinner at my favourite restaurant.
I have found a little time to bake though, and on Saturday morning I was craving Cinnamon rolls. I love these as they are so sweet and tasty but somehow, and I'm not quite sure why (Maybe it's the cinnamon) I still feel like it's acceptable to eat them for breakfast (Not that that usually stops me eating cake for breakfast)
Any way here they are:

And here's how they are made:
Cinnamon Rolls
Makes 8
350g Self raising Flour
Pinch of Salt
3 tbsp Caster Sugar
1 1/2 Tsp Ground Cinnamon
100g Butter, melted
2 egg yolks
200ml Milk
For the filling
1 heaped tsp Ground Cinnamon
55g Soft light brown Sugar
2 tbsp Caster Sugar
1 tbsp Butter, Melted
Topping
2 tbsp icing sugar
water
Pre heat the oven to 180deg C and grease an 8 inch round cake tin and line the base with baking paper.
Mix the flour, salt caster sugar and cinnamon together in a large bowl. Beat together the butter, milk and egg yolks and add these to the dry ingredients. Combine until a soft dough is formed.
Turn out onto a floured surface (or floured baking paper for ease of rolling up) and roll out a rectangle of 10inches by 12 inches, approx.
Mix the filling ingredients together in a bowl and spread this mixture evenly over the dough. Roll the dough up like a Swiss roll to form a log and cut this into 8 slices. Arrange these around the tin and brush with a little milk to glaze.
Bake in the oven for 30 - 35 minutes or until golden brown. Leave to cool slight;y and then remove from the tin.
If desired the buns can then be iced with a little icing drizzled over, Just combine 2 tbsp icing sugar with a few drops of water and drizzle this over the buns.
Then pull apart and eat as desired, nom!
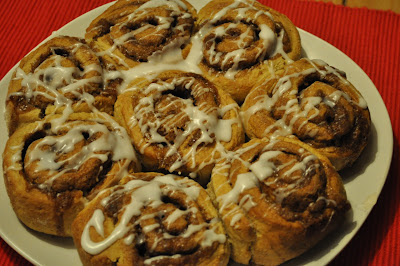
I made these on Saturday and there is only one left and I am ashamed to say that I ate all but one of the eaten rolls, ooops. Oh well I'll start the healthy eating / exercise plan again tomorrow.
Any way that's it for now, hope you all had a lovely weekend.
Cupcake Kris
One of my best friends is getting married next January and I was delighted that she has asked me to be a bridesmaid! she has also asked me to bake all the cupcakes for the wedding so there has been a lot of planning and looking at pictures of cupcakes and cases that she would like. I have also been a dutiful bridesmaid and we all went along to a wedding fair to look at all the pretty things and organise some of the most important aspects of the wedding (Chocolate fountain!)
I've also had an important cocktail meeting with friends, went to the cinema to see The Artist (Brilliant and I'm just in love with Uggie the little dog) and then this weekend I've been enjoying the Chinese new year festivities watching the dragon dance and then out to dinner at my favourite restaurant.
I have found a little time to bake though, and on Saturday morning I was craving Cinnamon rolls. I love these as they are so sweet and tasty but somehow, and I'm not quite sure why (Maybe it's the cinnamon) I still feel like it's acceptable to eat them for breakfast (Not that that usually stops me eating cake for breakfast)
Any way here they are:

And here's how they are made:
Cinnamon Rolls
Makes 8
350g Self raising Flour
Pinch of Salt
3 tbsp Caster Sugar
1 1/2 Tsp Ground Cinnamon
100g Butter, melted
2 egg yolks
200ml Milk
For the filling
1 heaped tsp Ground Cinnamon
55g Soft light brown Sugar
2 tbsp Caster Sugar
1 tbsp Butter, Melted
Topping
2 tbsp icing sugar
water
Pre heat the oven to 180deg C and grease an 8 inch round cake tin and line the base with baking paper.
Mix the flour, salt caster sugar and cinnamon together in a large bowl. Beat together the butter, milk and egg yolks and add these to the dry ingredients. Combine until a soft dough is formed.
Turn out onto a floured surface (or floured baking paper for ease of rolling up) and roll out a rectangle of 10inches by 12 inches, approx.
Mix the filling ingredients together in a bowl and spread this mixture evenly over the dough. Roll the dough up like a Swiss roll to form a log and cut this into 8 slices. Arrange these around the tin and brush with a little milk to glaze.
Bake in the oven for 30 - 35 minutes or until golden brown. Leave to cool slight;y and then remove from the tin.
If desired the buns can then be iced with a little icing drizzled over, Just combine 2 tbsp icing sugar with a few drops of water and drizzle this over the buns.
Then pull apart and eat as desired, nom!

I made these on Saturday and there is only one left and I am ashamed to say that I ate all but one of the eaten rolls, ooops. Oh well I'll start the healthy eating / exercise plan again tomorrow.
Any way that's it for now, hope you all had a lovely weekend.
Cupcake Kris
Monday, 9 January 2012
Mincemeat Spice Muffins.
Well I hope you all had a lovely holiday, I haven't posted in a couple of weeks as I've just been getting back into the swing of things, taking the decorations down, going back to work and already breaking my resolutions. The holidays are officially over, oh boo :( lets all have some cake to cheer ourselves up hey?
Any way I hope you all had a great New Year, I spent mine eating yummy food with fabulous friends and then drinking a lot of wine, It was very much enjoyed.
So after all the copious amounts of cake I made over Christmas were eaten, I somehow still had some surplus ingredients, including most of a big jar of mincemeat left over from making mince pies. So I looked for a new recipe that would use this up as I think I've eaten enough mince pies for a year. I fancied something a bit lighter than a mince pie but that could still be made quickly and with relatively few ingredients.
I came across a recipe for Christmas Snowflake muffins in The Big Book of Baking, However I have changed the name as because I don't have a snowflake cutter to cut out the icing to top the cakes with the name seemed a little silly. Any way here they are :

I topped some with a disc of fondant and left some plain.
They came out really nice, the smell just after they come out of the oven is wonderful and the muffins themselves are really light with a good hint of spice and warming fruit. I added some chopped cherries to my batch as my mincemeat wasn't as packed with as much of a variety of fruit as I'd like, this recipe is quite flexible so all different fruit / nuts could be added.
On making my second batch of these I decided to use more mincemeat for that extra kick of flavour and filling. But apart from that the cakes were definitely yummy and a perfect use of any leftover mincemeat or a good excuse to take advantage of the half price offers on it in the shops.
Here's how they are made:
Mincemeat Spice Muffins (Christmas Snowflake Muffins)
Makes 12:
280g Plain Flour
1 tbsp Baking powder
1 1/2 tsp Mixed Spice
Pinch of Salt
115g Soft dark brown sugar
2 Eggs
100ml Milk
6 tbsp Sunflower oil
200g Luxury mincemeat (I would use nearer 300g)
about 8-10 Glace cherries, chopped
To top
1 tbsp Apricot jam
Ready to roll white icing.
Pre heat the oven to 200 deg C and line a 12 hole muffin tray with cases.
Sift together the flour, baking powder, Mixed spice, and salt into a large bowl , stir in the sugar.
Beat the eggs together and then beat in the milk and oil. Make a well in the centre of the dry ingredients and pour in the liquid ingredients, mincemeat and cherries and stir until just combined.
Spoon the mixture into the cases and bake for around 20 minutes until well risen and golden brown.
Leave to cool on a wire rack.
To top, knead the icing until pliable and roll out, cut out 12 snowflake shapes, however I just cut circles.
Warm the Apricot jam until runny and brush over the cakes, the top with the icing snowflakes.
And that's it! The recipe does call to decorate with those little silver edible balls, however I cannot bear these, and why anyone would want to risk cracking their teeth on their rock hard shell I do not know, I did top a few of my cakes with half a cherry though as you can see:


Any way that's all from me today I hope you are all all having more success with your new years resolutions than I am. Bye for now,
Cupcake Kris xxx
Any way I hope you all had a great New Year, I spent mine eating yummy food with fabulous friends and then drinking a lot of wine, It was very much enjoyed.
So after all the copious amounts of cake I made over Christmas were eaten, I somehow still had some surplus ingredients, including most of a big jar of mincemeat left over from making mince pies. So I looked for a new recipe that would use this up as I think I've eaten enough mince pies for a year. I fancied something a bit lighter than a mince pie but that could still be made quickly and with relatively few ingredients.
I came across a recipe for Christmas Snowflake muffins in The Big Book of Baking, However I have changed the name as because I don't have a snowflake cutter to cut out the icing to top the cakes with the name seemed a little silly. Any way here they are :

I topped some with a disc of fondant and left some plain.
They came out really nice, the smell just after they come out of the oven is wonderful and the muffins themselves are really light with a good hint of spice and warming fruit. I added some chopped cherries to my batch as my mincemeat wasn't as packed with as much of a variety of fruit as I'd like, this recipe is quite flexible so all different fruit / nuts could be added.
On making my second batch of these I decided to use more mincemeat for that extra kick of flavour and filling. But apart from that the cakes were definitely yummy and a perfect use of any leftover mincemeat or a good excuse to take advantage of the half price offers on it in the shops.
Here's how they are made:
Mincemeat Spice Muffins (Christmas Snowflake Muffins)
Makes 12:
280g Plain Flour
1 tbsp Baking powder
1 1/2 tsp Mixed Spice
Pinch of Salt
115g Soft dark brown sugar
2 Eggs
100ml Milk
6 tbsp Sunflower oil
200g Luxury mincemeat (I would use nearer 300g)
about 8-10 Glace cherries, chopped
To top
1 tbsp Apricot jam
Ready to roll white icing.
Pre heat the oven to 200 deg C and line a 12 hole muffin tray with cases.
Sift together the flour, baking powder, Mixed spice, and salt into a large bowl , stir in the sugar.
Beat the eggs together and then beat in the milk and oil. Make a well in the centre of the dry ingredients and pour in the liquid ingredients, mincemeat and cherries and stir until just combined.
Spoon the mixture into the cases and bake for around 20 minutes until well risen and golden brown.
Leave to cool on a wire rack.
To top, knead the icing until pliable and roll out, cut out 12 snowflake shapes, however I just cut circles.
Warm the Apricot jam until runny and brush over the cakes, the top with the icing snowflakes.
And that's it! The recipe does call to decorate with those little silver edible balls, however I cannot bear these, and why anyone would want to risk cracking their teeth on their rock hard shell I do not know, I did top a few of my cakes with half a cherry though as you can see:


Any way that's all from me today I hope you are all all having more success with your new years resolutions than I am. Bye for now,
Cupcake Kris xxx
Subscribe to:
Posts (Atom)