Phew it's been a pretty busy weekend for me, I am aware it's Monday night as well but since I had today off work my busy weekend was extended, and I still didn't have enough time to do everything on my to do list. (Ashamedly I am going to admit that this is an actual list! I am a little ocd when it comes to writing lists.)
So the weekend for me started off on Friday night when I took part in a 3 hour Zumbathon for Comic relief. I donned a red tutu and danced Zumba for the full 3 hours. By the time I got home it was 10pm, I hadn't eaten yet and I had cupcakes to ice. As the next day I had to get up at 6.30am to go Go Karting.
It has become a bit of a tradition now that when I meet up with a group of my old School friends that I bring Cupcakes. It has come to be expected that even if we are just going to the pub that after our pub dinner I dish out cupcakes (Much to the annoyance of the pub manager) So when we all decided to go Go Karting I couldn't disappoint and I brought along some appropriately decorated cupcakes.
Then after Go Karting cue pub dinner and dessert (Had to balance out all the sport some how)
Then there was Sunday in which I went to visit my old High School before it is torn down and replaced by the new one that has been built. It's kinda sad but it really did need it as some parts of the school looked very old and tired. After I'd finished looking round the school I went onto the christening party of a friends baby then to the pub again (There's a theme here). And then I got home and It all caught up with me and I fell asleep on the couch as soon as I sat down.
So all in all even I was surprised that I found time to make the race day cupcakes and even some cupcake toppers for them.
Here they are:
For first second and third place! I don't have a printer so I had to draw these toppers in back Biro.
Ready set go cupcakes in corresponding cases (There were 6 of these) for those drivers who didn't place.
And finally a chequered flag cupcake using fondant icing died black, cut into squares and placed over butter cream.
I discovered that even though I found Go Karting very fun I'm not the best driver (not surprising considering I've never driven a real car) but if you bring cupcakes no one really mentions when you lose hehe.
For the cakes I just stuck with trusty chocolate as it always pleases with a vanilla butter cream. The recipes for this is on an earlier blog. and each topper was made using the bottom of 2 cake cases, a bamboo skewer and spray mount.
I also helped boyfriend today make a chocolate bunt cake for his mum and dad but he said I couldn't take a picture of it as he didn't feel it was worthy but I think he did well.
Any way so that was my busy weekend that still involved cupcakes but no new recipe sorry!
Monday, 21 March 2011
Monday, 14 March 2011
Chocolate Orange Cupcakes
Last week was my fab friend Alex's birthday week (Yes she gets a whole week for her birthday) and she had requested I make her some cupcakes to take into her work. It's always struck me as an odd tradition people bringing cake in on their birthday I mean surely they should be supplied with cake, not be the suppliers.
Any way either way there is cake involved so I'm happy. Alex had asked for 6 pretty pink or blue vanilla cupcakes and 6 chocolate orange cupcakes (however she gave into temptation and only 5 of theses made it to work)
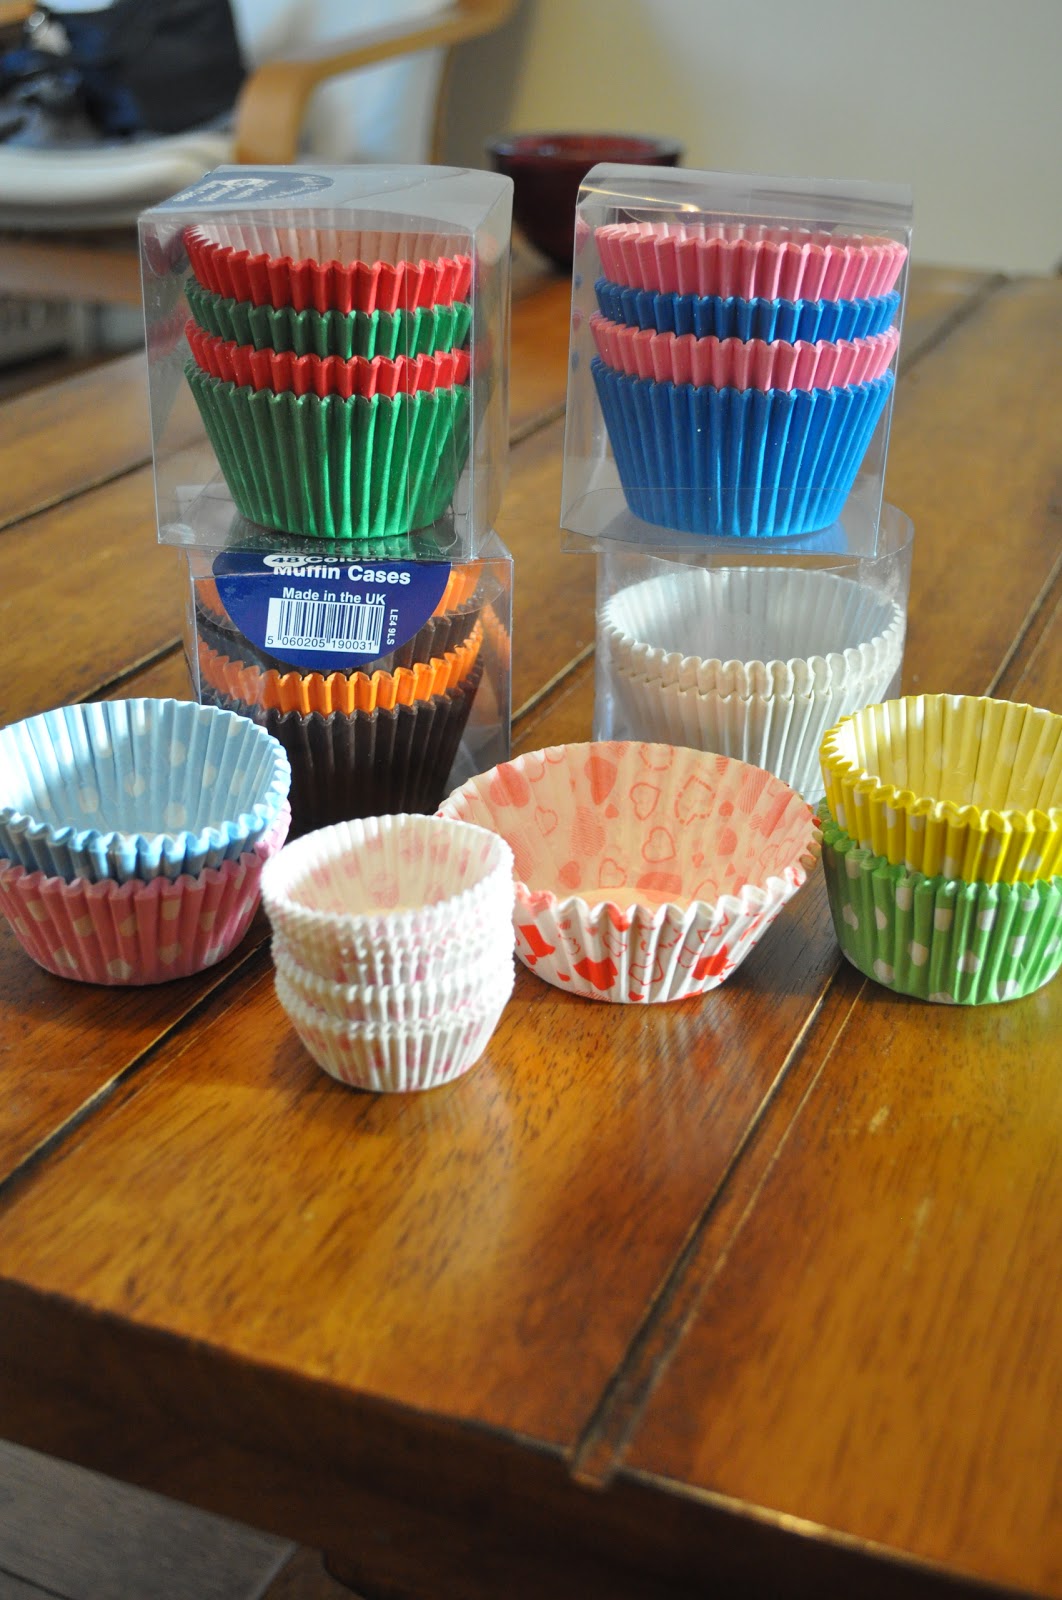
Before I started making them I went shopping for cupcake cases as I didn't want to use plain white and when I got home I realised that recently I have been buying waaaay to many cupcake cases:
Any way onto the cakes, I wanted to make Alex's vanilla cakes super cute so I topped them of with a cherry, sprinkles and a sherbet strawberry straw! Here they are:
The colour doesn't come out to well in the pic but they were a really bubblegum pink colour.
And here are the chocolate orange cakes:
And here's how they're made
makes 12
Chocolate orange cupcakes:
100g Plain Flour
20g Cocoa powder
140g Caster sugar
1 1/2 tsp baking powder
pinch of salt
Zest of 1 orange
40g Butter
100ml milk
1 Egg
Juice of 1 orange
2 tsp Orange extract
Preheat the oven to 170 degC. Put the flour, sugar, cocoa, baking powder, salt, orange zest and butter in a mixing bowl and mix together or rub between your fingertips until you get a sandy consistency.
Add the Orange juice and stir.
Whisk the milk and egg together and add half of this to the mixture to the dry ingredients and whisk until just incorporated. Add the remaining milk mix. Stir in the orange extract then taste and add a little more juice or extract if needed.
Bake in the oven for about 20 minutes or until the sponge bounces back when touched. Leave to cool on a wire rack whilst you make the frosting.
Chocolate Orange frosting.
300g Icing sugar
100g Unsalted butter
40g Cocoa powder
40ml milk
1 tsp Orange extract
Combine all the ingredients with an electric whisk until smooth, then pipe or spoon over cooled cakes.
Top with a slice of chocolate orange or some grated orange zest.
And that's it. hope you all had a wonderful week.
Cupcake Kris xx
Linked to foodie-friends-friday-linky-party
Any way either way there is cake involved so I'm happy. Alex had asked for 6 pretty pink or blue vanilla cupcakes and 6 chocolate orange cupcakes (however she gave into temptation and only 5 of theses made it to work)
Before I started making them I went shopping for cupcake cases as I didn't want to use plain white and when I got home I realised that recently I have been buying waaaay to many cupcake cases:
Any way onto the cakes, I wanted to make Alex's vanilla cakes super cute so I topped them of with a cherry, sprinkles and a sherbet strawberry straw! Here they are:
The colour doesn't come out to well in the pic but they were a really bubblegum pink colour.
And here are the chocolate orange cakes:
And here's how they're made
makes 12
Chocolate orange cupcakes:
100g Plain Flour
20g Cocoa powder
140g Caster sugar
1 1/2 tsp baking powder
pinch of salt
Zest of 1 orange
40g Butter
100ml milk
1 Egg
Juice of 1 orange
2 tsp Orange extract
Preheat the oven to 170 degC. Put the flour, sugar, cocoa, baking powder, salt, orange zest and butter in a mixing bowl and mix together or rub between your fingertips until you get a sandy consistency.
Add the Orange juice and stir.
Whisk the milk and egg together and add half of this to the mixture to the dry ingredients and whisk until just incorporated. Add the remaining milk mix. Stir in the orange extract then taste and add a little more juice or extract if needed.
Bake in the oven for about 20 minutes or until the sponge bounces back when touched. Leave to cool on a wire rack whilst you make the frosting.
Chocolate Orange frosting.
300g Icing sugar
100g Unsalted butter
40g Cocoa powder
40ml milk
1 tsp Orange extract
Combine all the ingredients with an electric whisk until smooth, then pipe or spoon over cooled cakes.
Top with a slice of chocolate orange or some grated orange zest.
And that's it. hope you all had a wonderful week.
Cupcake Kris xx
Linked to foodie-friends-friday-linky-party
Sunday, 6 March 2011
Chocolate and Peanut Butter High-Hat Cupcakes.
I'm a happy bunny today because not only did I get a pretty new pink mixing bowl but I also finally got round to making High-hat cupcakes, and they didn't turn out the complete disaster that I feared they would.
They didn't look as good as I'd hoped but for a first attempt they will suffice. However the taste made up for the slightly sloppy appearance. I mean how do you make a cupcake better... that's right! Dip it in chocolate!
Here they are:
And in the middle: Peanut butter frosting:
First I started out with some basic chocolate cupcakes. I did my usual trick of bumping into the oven and accidentally turning it up - go me. Good job I noticed in time and turned it down before they burnt. You can find the recipe for them here.
Then to make the peanut butter frosting I blended
40g Butter
A big heaped tablespoon of smooth peanut butter
30ml Milk
250g Icing Sugar
Then pipe this on top of your cooled cakes. Now the important bit. Put the frosted cakes in the freezer to chill. this will help keep the icing in one piece and attached to the cake when dipping. (I learnt the hard way not to be impatient with this stage)
Whilst the cakes are in the freezer melt some chocolate in a bowl over a pan of water (I used about 300g chocolate and this was enough for 6 cakes.) Then pour the melted chocolate into something deep enough to dip the icing. I used a wide brimmed hi-ball glass. leave this to cool for a little bit so the chocolate doesn't instantly melt the icing. I found the chocolate I used (it wasn't the best quality chocolate) was a little thick so I used a teaspoon of milk to thin it a little.
Then comes the nerve wracking bit. Take a cupcake, and holding it upside down dip it in the chocolate and lift out. Twist the cake so any excess chocolate dips off and then leave to chill till the chocolate sets.
I really wish I would have got boyfriend to take pictures of the cake being dipped but I was to busy panicking everything would go wrong.
I also made some diddy tiny versions, I don't know why everything is just cuter tiny!
These are really tiny and just one bite worth.
When I ran out of peanut butter frosting I frosted some cakes with chocolate butter cream then drizzled some with caramel coloured white chocolate and dipped some in it. The white chocolate was a bit thicker so slightly smooshed the icing down as it coated it.
They didn't look as good as I'd hoped but for a first attempt they will suffice. However the taste made up for the slightly sloppy appearance. I mean how do you make a cupcake better... that's right! Dip it in chocolate!
Here they are:
Then to make the peanut butter frosting I blended
40g Butter
A big heaped tablespoon of smooth peanut butter
30ml Milk
250g Icing Sugar
Then pipe this on top of your cooled cakes. Now the important bit. Put the frosted cakes in the freezer to chill. this will help keep the icing in one piece and attached to the cake when dipping. (I learnt the hard way not to be impatient with this stage)
Whilst the cakes are in the freezer melt some chocolate in a bowl over a pan of water (I used about 300g chocolate and this was enough for 6 cakes.) Then pour the melted chocolate into something deep enough to dip the icing. I used a wide brimmed hi-ball glass. leave this to cool for a little bit so the chocolate doesn't instantly melt the icing. I found the chocolate I used (it wasn't the best quality chocolate) was a little thick so I used a teaspoon of milk to thin it a little.
Then comes the nerve wracking bit. Take a cupcake, and holding it upside down dip it in the chocolate and lift out. Twist the cake so any excess chocolate dips off and then leave to chill till the chocolate sets.
I really wish I would have got boyfriend to take pictures of the cake being dipped but I was to busy panicking everything would go wrong.
I also made some diddy tiny versions, I don't know why everything is just cuter tiny!
These are really tiny and just one bite worth.
When I ran out of peanut butter frosting I frosted some cakes with chocolate butter cream then drizzled some with caramel coloured white chocolate and dipped some in it. The white chocolate was a bit thicker so slightly smooshed the icing down as it coated it.
Ok so confession, the chocolate wasn't meant to be caramel coloured it was originally plain white but I spilled a tiny bit of cocoa powder in it. Ooops! I don't have a picture of these cut in half as I'm saving them for tomorrow.
And that's it! Not the highest or neatest of high hat cupcakes but the taste definitely makes up for it. The peanut butter frosted ones work perfectly with the sweetness of the chocolate and the slightly salty peanut butter taste of the frosting. I think they are boyfriends new favorite and I'm definitely going to be trying them again to see if I can improve.
I've linked this post up to a great blog that lets bloggers post all their yummy sweet treats they've made this week if your ever looking for hundreds of ideas for cakes just look here
Any way that's it for now.
Keep baking
Cupcake Kris
xxx
Thursday, 24 February 2011
Love-bug sugar cookies.
I've decided that I definitely enjoy making and icing cakes more than biscuits. I think this is due to the fact that the biscuits I made yesterday took way longer than I thought to ice and also because I am not very good at icing them. They never turn out how I imagine they will.
I think this is down to the fact that to make beautifully iced biscuits you need to be patient and neat and those are 2 things I definitely am not.
Any way I had been meaning to make these biscuits on valentines day however as usual time got away from me. But hey heart shaped biscuits should be eaten all year round in my book. Any way here are my Love-bug Iced biscuits. I'm sorry they're not so great and neither is the photography.
They are a basic Vanilla biscuit then I piped a line of thick red icing around the heart cutting off before the tip and I filled this with red flooding icing. I then iced the tip with white icing then once dry decorated with black spots and faces.
Here's how:
For the biscuits:
Makes about 24
350g Plain Flour
100g Self Raising Flour
125g Granulated Sugar
125g Butter Softened and Diced
125g Golden Syrup
1 Large Egg beaten
Pinch of Salt
Sift the flours together into a bowl. Add the sugar and salt and mix well. Add the butter and rub into the mixture with your fingertips until the mix resembles breadcrumbs.
Make a well in the centre and add the egg and syrup. Mix well, drawing any of the flour left at the side of the bowl and stop as soon as a ball has formed.
Roll the dough in between 2 sheets of greaseproof paper (This way doesn't use flour so stops the dough from getting to tough) until it's about 5mm thick. Then chill the rolled out dough in the fridge for about 30mins.
Pre-heat the oven to 170deg C Then cut the the biscuits out and bake on a lined baking tray for about 12 - 15 mins. Once the biscuits are cooled they are ready to ice.
For the outlining icing Mix icing sugar with colour and water (Adding a drop at a time) Until you have icing about the consistency of toothpaste. Then ice this around the edges where required. Then for the flooding icing make the icing to about the consistency of thick custard and pipe inside the outline, spreading out where necessary. Leave to dry until the icing is hard. This can be done by placing the biscuits in the oven on its lowest setting for around 30 minutes. Then decorate with more think piping icing.
And that's it! I did plan to try making a few using flood on flood icing so that the bugs spots were set into the biscuit like the red icing however as I only had one piping bag and a lot of biscuits it was just taking to long and i was still icing at 11pm - (Note to self, organise my time better) They don't look as great as I'd have liked but They still taste pretty great.
Back to cakes next week.
Any way bye for now
Cupcake Kris
xxx
I think this is down to the fact that to make beautifully iced biscuits you need to be patient and neat and those are 2 things I definitely am not.
Any way I had been meaning to make these biscuits on valentines day however as usual time got away from me. But hey heart shaped biscuits should be eaten all year round in my book. Any way here are my Love-bug Iced biscuits. I'm sorry they're not so great and neither is the photography.
They are a basic Vanilla biscuit then I piped a line of thick red icing around the heart cutting off before the tip and I filled this with red flooding icing. I then iced the tip with white icing then once dry decorated with black spots and faces.
Here's how:
For the biscuits:
Makes about 24
350g Plain Flour
100g Self Raising Flour
125g Granulated Sugar
125g Butter Softened and Diced
125g Golden Syrup
1 Large Egg beaten
Pinch of Salt
Sift the flours together into a bowl. Add the sugar and salt and mix well. Add the butter and rub into the mixture with your fingertips until the mix resembles breadcrumbs.
Make a well in the centre and add the egg and syrup. Mix well, drawing any of the flour left at the side of the bowl and stop as soon as a ball has formed.
Roll the dough in between 2 sheets of greaseproof paper (This way doesn't use flour so stops the dough from getting to tough) until it's about 5mm thick. Then chill the rolled out dough in the fridge for about 30mins.
Pre-heat the oven to 170deg C Then cut the the biscuits out and bake on a lined baking tray for about 12 - 15 mins. Once the biscuits are cooled they are ready to ice.
For the outlining icing Mix icing sugar with colour and water (Adding a drop at a time) Until you have icing about the consistency of toothpaste. Then ice this around the edges where required. Then for the flooding icing make the icing to about the consistency of thick custard and pipe inside the outline, spreading out where necessary. Leave to dry until the icing is hard. This can be done by placing the biscuits in the oven on its lowest setting for around 30 minutes. Then decorate with more think piping icing.
And that's it! I did plan to try making a few using flood on flood icing so that the bugs spots were set into the biscuit like the red icing however as I only had one piping bag and a lot of biscuits it was just taking to long and i was still icing at 11pm - (Note to self, organise my time better) They don't look as great as I'd have liked but They still taste pretty great.
Back to cakes next week.
Any way bye for now
Cupcake Kris
xxx
Wednesday, 16 February 2011
Valentines cupcakes and an Award.
Wow it's been 10 days since I've blogged and I really feel like I've abandoned my blog after just 10 days. I've been busy but I've still been keeping up with all the wonderful blogs I read and I was pleased to see that the lovely Domestic Goddess Wannabe from karen and nigella had bestowed me with a Stylish Blogger award. Check out her blog it's always updated with brill recipes.
There are four rules to taking part - thank and link to the blogger who nominated you; share seven things about yourself; award 15 new bloggers, and tell them you have done it. I will be passing the baton to:
http://frombeyondmykitchenwindow.blogspot.com/
http://cornercottagebakery.blogspot.com/
http://cookiescakesandallthingsbaked.blogspot.com/
http://thechocolatepot.blogspot.com/
http://choclogblog.blogspot.com/
http://cakecrumbsandcooking.blogspot.com/
http://brownievillegirl.blogspot.com/
http://asoutherngrace.blogspot.com/
http://sweet-as-sugar-cookies.blogspot.com/
http://sourcherrybakewell.blogspot.com/
http://mainlybaking.blogspot.com/
http://littlewillowthinking.blogspot.com/
http://lifestooshorttoskipdessert.blogspot.com/
http://kimmykitchen.blogspot.com/
http://goddessofbaking.blogspot.com/
I found it really hard to thing of 7 things about me (I can't be that boring right) but I found it really hard to think on the spot but here we go.
1) I love my music and always wished I could play an instrument but I don't have the patience. I like many types of music but mainly rock and metal and my fave bands include, Biffy Clyro, Clutch, Incubus, Killswitch Engage, RATM, AC/DC and many many more. I adore live gigs.
2) I live with my lovely boyfriend and a very naughty border collie pup called Clyro. Clyro likes to chew things he shouldn't especially if those things are electricals belonging to my boyfriend. Clyro's favourite is playstation pads.
3) As you know I love making cakes and baking but I also like to try my hand at making jewellery and clothes now and again. My mum has worked as a dress maker and this Christmas she got me a sewing machine of my own.
4) I studied film and TV at university and I used to work for the extreme sports channel. One day I hope to go back to working in television.
5) I love to read and will read pretty much any genre of book. I do like Sci fi and Fantasy though and that also is what I like to watch on TV although I do have a guilty pleasure which is I love to watch Americas next top model.
6) As I said I studied film I have many Faves but a few I can watch over and over are: The Big Lebowski, Withnail and I, Almost Famous and anything that can make me laugh.
7) I talk way too much and way too fast.
So there you go.
Anyway on to Cupcakes:
I wanted to bake much more this weekend but I was rather busy so I have postponed some of my planned baking however I did have an order from a friend for some Valentines themed cupcakes and here they are:
I made some Vanilla and some Chocolate and decorated with Vanilla and Chocolate Butter cream and Fondant hearts, Love hearts, sprinkles and jelly lips.
The vanilla cakes were baked with a smaller red heart shaped cake inside each one like so:
the theory being that when you slice them in half there's a secret red heard in the centre. I got the idea from a wonderful site called bake it in a cake My hearts were a little bigger than I think they should have been and Not as red/pink as I would have liked them.
Unfortunately I don't have a pic of mine cut in half as I'm dozy and accidentally deleted it but they were no were near as good as the bake it in a cake ones though, even though they still tasted great.
The recipe for the Chocolate Cupcakes and frosting are here
And that's it. Hopefully I'll get round to doing all the baking I've postponed over the past few days and there will be another Valentine's themed (All be it an untimely one) blog soon
Anyway bye for now
Cupcake Kris
There are four rules to taking part - thank and link to the blogger who nominated you; share seven things about yourself; award 15 new bloggers, and tell them you have done it. I will be passing the baton to:
http://frombeyondmykitchenwindow.blogspot.com/
http://cornercottagebakery.blogspot.com/
http://cookiescakesandallthingsbaked.blogspot.com/
http://thechocolatepot.blogspot.com/
http://choclogblog.blogspot.com/
http://cakecrumbsandcooking.blogspot.com/
http://brownievillegirl.blogspot.com/
http://asoutherngrace.blogspot.com/
http://sweet-as-sugar-cookies.blogspot.com/
http://sourcherrybakewell.blogspot.com/
http://mainlybaking.blogspot.com/
http://littlewillowthinking.blogspot.com/
http://lifestooshorttoskipdessert.blogspot.com/
http://kimmykitchen.blogspot.com/
http://goddessofbaking.blogspot.com/
I found it really hard to thing of 7 things about me (I can't be that boring right) but I found it really hard to think on the spot but here we go.
1) I love my music and always wished I could play an instrument but I don't have the patience. I like many types of music but mainly rock and metal and my fave bands include, Biffy Clyro, Clutch, Incubus, Killswitch Engage, RATM, AC/DC and many many more. I adore live gigs.
2) I live with my lovely boyfriend and a very naughty border collie pup called Clyro. Clyro likes to chew things he shouldn't especially if those things are electricals belonging to my boyfriend. Clyro's favourite is playstation pads.
3) As you know I love making cakes and baking but I also like to try my hand at making jewellery and clothes now and again. My mum has worked as a dress maker and this Christmas she got me a sewing machine of my own.
4) I studied film and TV at university and I used to work for the extreme sports channel. One day I hope to go back to working in television.
5) I love to read and will read pretty much any genre of book. I do like Sci fi and Fantasy though and that also is what I like to watch on TV although I do have a guilty pleasure which is I love to watch Americas next top model.
6) As I said I studied film I have many Faves but a few I can watch over and over are: The Big Lebowski, Withnail and I, Almost Famous and anything that can make me laugh.
7) I talk way too much and way too fast.
So there you go.
Anyway on to Cupcakes:
I wanted to bake much more this weekend but I was rather busy so I have postponed some of my planned baking however I did have an order from a friend for some Valentines themed cupcakes and here they are:
I made some Vanilla and some Chocolate and decorated with Vanilla and Chocolate Butter cream and Fondant hearts, Love hearts, sprinkles and jelly lips.
The vanilla cakes were baked with a smaller red heart shaped cake inside each one like so:
the theory being that when you slice them in half there's a secret red heard in the centre. I got the idea from a wonderful site called bake it in a cake My hearts were a little bigger than I think they should have been and Not as red/pink as I would have liked them.
Unfortunately I don't have a pic of mine cut in half as I'm dozy and accidentally deleted it but they were no were near as good as the bake it in a cake ones though, even though they still tasted great.
The recipe for the Chocolate Cupcakes and frosting are here
And that's it. Hopefully I'll get round to doing all the baking I've postponed over the past few days and there will be another Valentine's themed (All be it an untimely one) blog soon
Anyway bye for now
Cupcake Kris
Sunday, 6 February 2011
Lots of baking books and Mince Pierogies
I've been meaning to post for a while about all the lovely baking books I've received as presents recently. Some where for Christmas and some were just because but I got quite a few and now I have so many recipes I want to try out that they will keep me in ideas for a very long time.
Anyway I took a picture of the newest additions to my recipe books. here they are:
You'll notice a book called Kinky Cupcakes that was from my great friend Mandie and it's such a cool and different book that gives you instructions on how to decorate cupcakes in really different and elaborate ways. I haven't attempted any yet but when I have a free afternoon I will definitely give it a go. Just look at these:
They involve making your own chocolate legs. The cupcake on the front of the book has legs sprouting from a can can skirt.
Another great book in that pile is the one called Taste Baking and that's where the recipe for today comes from. It's a wonderful book filled with not only sweet baking but also savoury ideas. And for once on my day of baking I didn't make sweet treats and stuck to savoury.
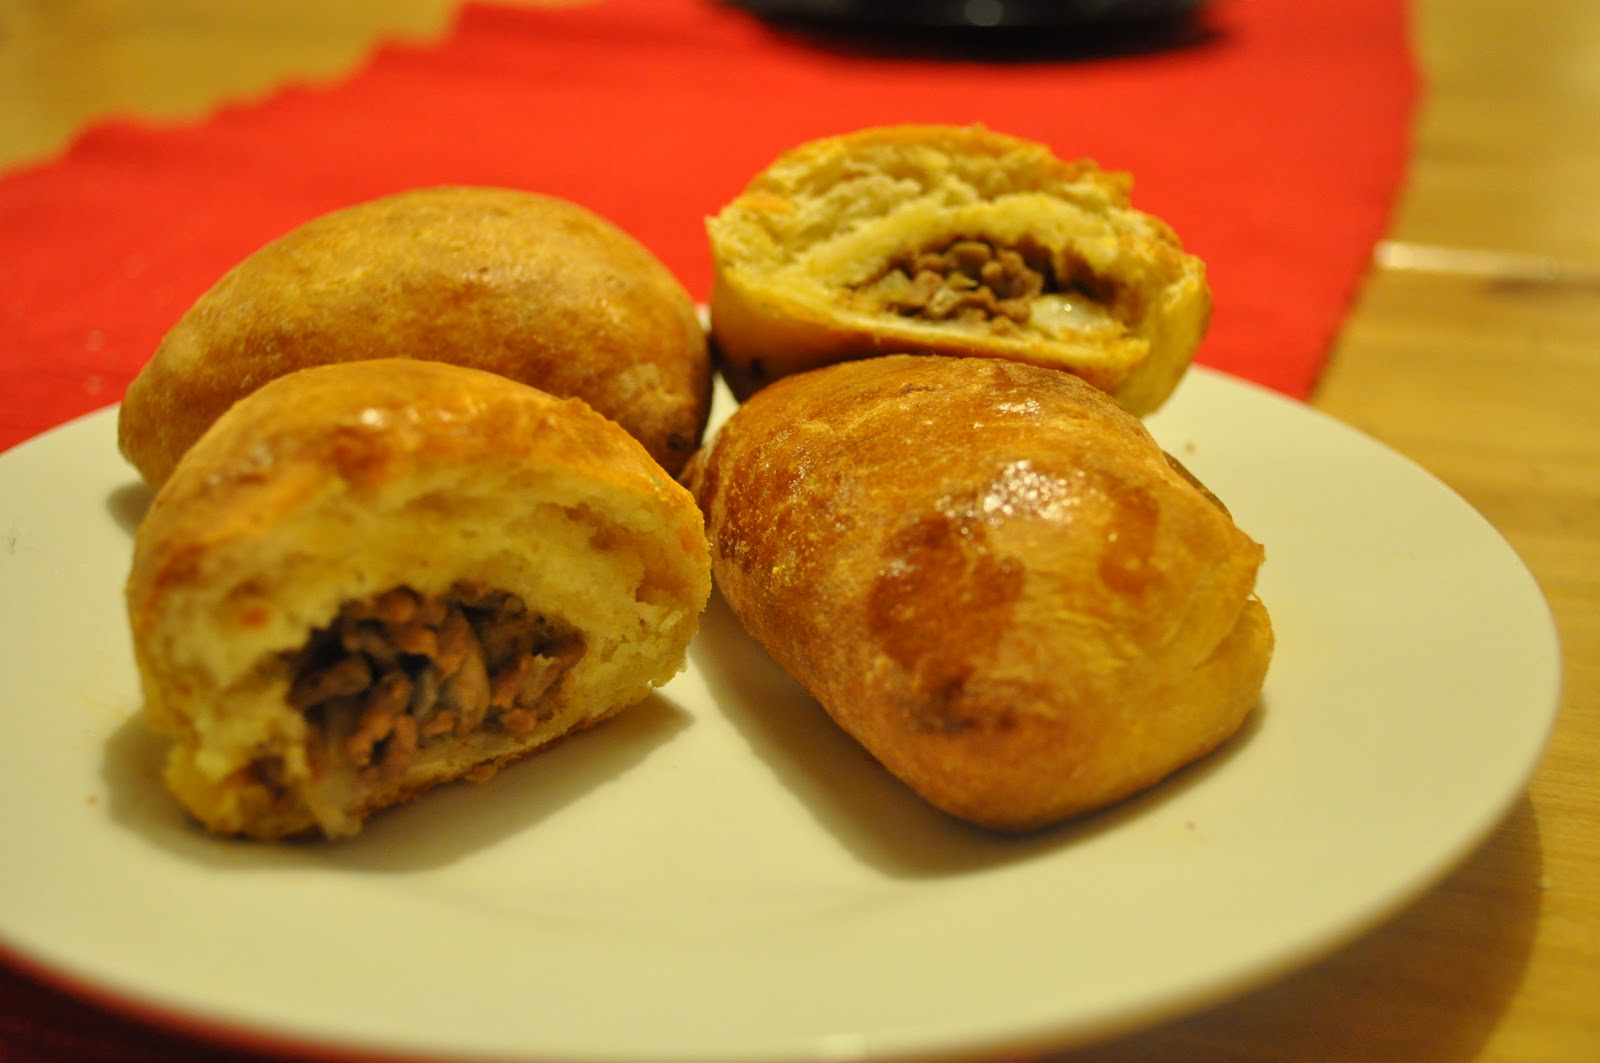
I tried a recipe called Mince Pierogies, something I had never heard of before and cant even pronounce the name but they are basically a bread roll with beef mince, onions and mushrooms baked inside. They're great for a hot lunch or a snack for visiting friends.
And here they are:
And here's how they're made (I've added to and adjusted the recipe slightly from the book to add my own favorite spices and change the size)
250g Plain flour (I found I needed quite a bit more as the dough was too sticky so used more like 300 - 320g)
7g sachet of easy bake yeast (The recipe only called for 3 1/2g but i tried to add a bit more as I'd added more flour an ended up adding the whole sachet but it worked fine.)
100ml Lukewarm milk
2 eggs
Pinch of sugar
2 tbsp Oil (I used olive)
1 tbsp Butter
1 Onion, chopped
1 Clove of garlic, chopped
200g Minced beef
50g Mushrooms peeled and chopped (I was far to lazy to peel)
1 Egg yolk, beaten
1/2 tsp Paprika
Dash of chili powder
Salt and pepper
Sieve the flour into a bowl and sprinkle over the yeast. Add the milk, eggs sugar and 1 tbsp of oil and mix. Knead into a soft elasticy dough. Cover and allow to rise in a warm place for 30 minutes.
Heat the butter with the remaining oil. Gently fry the onion and garlic. Add the mince and fry until brown, mix in the mushrooms and fry for 1 - 2 minutes, season with salt, pepper, paprika and chili or whatever herbs and spices take your fancy.
Heat the oven to 240 deg C
Roll out the dough onto a floured surface (the recipe didn't specify how thick, I went for around 2cm.) and cut out circles about 6cm in diameter. I wanted my rolls to be bigger than the recipe (partially because I'm greedy and partially because I'm lazy and dint want the fiddly job of filling tiny circles) so i cut out circles of about 10cm diameter.
Spoon a mound of filling onto each circle fold to make a semi circle and press the edges down well (It is really important to make sure they are really well sealed as I had a couple burst.)
Place on a baking sheet lined with greaseproof paper, brush with egg yolk and leave to rise for a further 15 minutes.
Bake for 15 minutes until golden brown.
So there you have it! Something savory for a change (Although you could easily fill these rolls with something sweet, diced apple etc.)
After I had made these I couldn't leave the kitchen without making something sweet though - I think I have an addiction. So I made some more muesli bars but this time I added a lot less butter and less syrup left out the cranberries and coconut and added 2tbsp of crunchy peanut butter and they worked really well.
The original muesli bar recipe is on the last post and I also linked it up to this other great blog I found sweet as sugar cookies . Where each week the blogger hosts Sweets for Saturday. It's a great place to find new recipes and blogs to follow.
Anyway that's it for today.
Bye for now
Cupcake Kris
Anyway I took a picture of the newest additions to my recipe books. here they are:
You'll notice a book called Kinky Cupcakes that was from my great friend Mandie and it's such a cool and different book that gives you instructions on how to decorate cupcakes in really different and elaborate ways. I haven't attempted any yet but when I have a free afternoon I will definitely give it a go. Just look at these:
They involve making your own chocolate legs. The cupcake on the front of the book has legs sprouting from a can can skirt.
Another great book in that pile is the one called Taste Baking and that's where the recipe for today comes from. It's a wonderful book filled with not only sweet baking but also savoury ideas. And for once on my day of baking I didn't make sweet treats and stuck to savoury.
I tried a recipe called Mince Pierogies, something I had never heard of before and cant even pronounce the name but they are basically a bread roll with beef mince, onions and mushrooms baked inside. They're great for a hot lunch or a snack for visiting friends.
And here they are:
And here's how they're made (I've added to and adjusted the recipe slightly from the book to add my own favorite spices and change the size)
250g Plain flour (I found I needed quite a bit more as the dough was too sticky so used more like 300 - 320g)
7g sachet of easy bake yeast (The recipe only called for 3 1/2g but i tried to add a bit more as I'd added more flour an ended up adding the whole sachet but it worked fine.)
100ml Lukewarm milk
2 eggs
Pinch of sugar
2 tbsp Oil (I used olive)
1 tbsp Butter
1 Onion, chopped
1 Clove of garlic, chopped
200g Minced beef
50g Mushrooms peeled and chopped (I was far to lazy to peel)
1 Egg yolk, beaten
1/2 tsp Paprika
Dash of chili powder
Salt and pepper
Sieve the flour into a bowl and sprinkle over the yeast. Add the milk, eggs sugar and 1 tbsp of oil and mix. Knead into a soft elasticy dough. Cover and allow to rise in a warm place for 30 minutes.
Heat the butter with the remaining oil. Gently fry the onion and garlic. Add the mince and fry until brown, mix in the mushrooms and fry for 1 - 2 minutes, season with salt, pepper, paprika and chili or whatever herbs and spices take your fancy.
Heat the oven to 240 deg C
Roll out the dough onto a floured surface (the recipe didn't specify how thick, I went for around 2cm.) and cut out circles about 6cm in diameter. I wanted my rolls to be bigger than the recipe (partially because I'm greedy and partially because I'm lazy and dint want the fiddly job of filling tiny circles) so i cut out circles of about 10cm diameter.
Spoon a mound of filling onto each circle fold to make a semi circle and press the edges down well (It is really important to make sure they are really well sealed as I had a couple burst.)
Place on a baking sheet lined with greaseproof paper, brush with egg yolk and leave to rise for a further 15 minutes.
Bake for 15 minutes until golden brown.
So there you have it! Something savory for a change (Although you could easily fill these rolls with something sweet, diced apple etc.)
After I had made these I couldn't leave the kitchen without making something sweet though - I think I have an addiction. So I made some more muesli bars but this time I added a lot less butter and less syrup left out the cranberries and coconut and added 2tbsp of crunchy peanut butter and they worked really well.
The original muesli bar recipe is on the last post and I also linked it up to this other great blog I found sweet as sugar cookies . Where each week the blogger hosts Sweets for Saturday. It's a great place to find new recipes and blogs to follow.
Anyway that's it for today.
Bye for now
Cupcake Kris
Tuesday, 1 February 2011
Oatylicious lunchtime snacks.
I love baking with porridge oats, mainly because I love the toasty nutty flavor of anything with oats in but also because no matter what you make with them they always make the treat seem like it's a little healthy and good for you, even if said treat is actually packed full of sugar and butter.
I'd been craving oatmeal and raisin cookies for a while and I also wanted to make some handy treats that I could easy wrap up each day and take to work for lunches. So, on Sunday I stocked up on oatmeal, dries fruit nuts and seeds and got baking.
First I made the oatmeal and raisin cookies I'd been craving and well they didn't make it past Monday until they had all been eaten so It's a good job I also made a ton of Muesli bars. Here they both are:
And here's how they're made: First the cookies as they are one of my all time favourites:
recipe via Hummingbird bakery.
Makes 20
270g Unsalted butter
160g Caster sugar
160g Soft dark brown sugar
2 eggs
few drops of vanilla extract
380g Plain flour
1 Tsp salt
1 Tsp bicarbonate of soda
1/2 tsp Cinnamon
110g Rolled oats
220g Raisins
Preheat the oven to 170deg C.
Put the butter and sugars in a bowl and whisk together until light and fluffy. Add the eggs one at a time mixing well. Then whisk in the vanilla extract.
Sift together the flour, salt, bicarbonate of soda and cinnamon in a separate bowl. Add the oats and mix well. Add to the butter mixture and beat until well mixed. Stir in the raisins with a wooden spoon until evenly dispersed.
Arrange equal amounts of cookie dough on to some prepared baking trays making sure the cookies have enough room to spread while baking. Bake in the pre-heated oven for about 12 minutes or until golden brown. Leave to cool on a wire rack.
And that's it for the cookies, now for the muesli bars:
These can be adapted to include any of your favourite dried fruit, nuts or seeds e.g, raisins, sultanas, apricot, sunflower seeds, cranberry, mango.... the mix of flavours and ingredients you can experiment with is vast and that's what makes these great, they never get boring.
makes about 15-20
I used:
320g Unsalted butter
240ml Golden syrup (although I'd definitely use less syrup next time as they were a little sticky - probably about 200ml)
250g Soft light brown sugar
270g Rolled oats
150g Desiccated coconut
125g Dried cranberries
125g Raisins
140g Cornflakes
100g Mixed seeds
good handful of cashews, chopped.
As I said feel free to mix the ingredients around to add more of your favorite.
Put the butter, golden syrup and sugar in a large saucepan over a medium heat until melted and smooth.
Put the oats, cereal and all your dried fruit/nuts/seeds into a large bowl and stir with a wooden spoon until everything is mixed. Pour in the butter mixture and mix until everything is combined and the dry ingredients are coated and evenly dispersed.
Press the mixture into a prepared baking tray and use a tablespoon to flatten it. Then cover this with a sheet of greaseproof paper and another baking tray covered in jam jars to compress the mixture. Leave this in the fridge overnight to cool and set.
And that's it, 2 recipes using porridge oats that aren't as healthy as I like to pretend they are.
Bye for now
Cupcake Kris xxx
I'd been craving oatmeal and raisin cookies for a while and I also wanted to make some handy treats that I could easy wrap up each day and take to work for lunches. So, on Sunday I stocked up on oatmeal, dries fruit nuts and seeds and got baking.
First I made the oatmeal and raisin cookies I'd been craving and well they didn't make it past Monday until they had all been eaten so It's a good job I also made a ton of Muesli bars. Here they both are:
And here's how they're made: First the cookies as they are one of my all time favourites:
recipe via Hummingbird bakery.
Makes 20
270g Unsalted butter
160g Caster sugar
160g Soft dark brown sugar
2 eggs
few drops of vanilla extract
380g Plain flour
1 Tsp salt
1 Tsp bicarbonate of soda
1/2 tsp Cinnamon
110g Rolled oats
220g Raisins
Preheat the oven to 170deg C.
Put the butter and sugars in a bowl and whisk together until light and fluffy. Add the eggs one at a time mixing well. Then whisk in the vanilla extract.
Sift together the flour, salt, bicarbonate of soda and cinnamon in a separate bowl. Add the oats and mix well. Add to the butter mixture and beat until well mixed. Stir in the raisins with a wooden spoon until evenly dispersed.
Arrange equal amounts of cookie dough on to some prepared baking trays making sure the cookies have enough room to spread while baking. Bake in the pre-heated oven for about 12 minutes or until golden brown. Leave to cool on a wire rack.
And that's it for the cookies, now for the muesli bars:
These can be adapted to include any of your favourite dried fruit, nuts or seeds e.g, raisins, sultanas, apricot, sunflower seeds, cranberry, mango.... the mix of flavours and ingredients you can experiment with is vast and that's what makes these great, they never get boring.
makes about 15-20
I used:
320g Unsalted butter
240ml Golden syrup (although I'd definitely use less syrup next time as they were a little sticky - probably about 200ml)
250g Soft light brown sugar
270g Rolled oats
150g Desiccated coconut
125g Dried cranberries
125g Raisins
140g Cornflakes
100g Mixed seeds
good handful of cashews, chopped.
As I said feel free to mix the ingredients around to add more of your favorite.
Put the butter, golden syrup and sugar in a large saucepan over a medium heat until melted and smooth.
Put the oats, cereal and all your dried fruit/nuts/seeds into a large bowl and stir with a wooden spoon until everything is mixed. Pour in the butter mixture and mix until everything is combined and the dry ingredients are coated and evenly dispersed.
Press the mixture into a prepared baking tray and use a tablespoon to flatten it. Then cover this with a sheet of greaseproof paper and another baking tray covered in jam jars to compress the mixture. Leave this in the fridge overnight to cool and set.
And that's it, 2 recipes using porridge oats that aren't as healthy as I like to pretend they are.
Bye for now
Cupcake Kris xxx
Subscribe to:
Posts (Atom)